S.T.A.L.K.E.R.: Shadow of Chernobyl Walkthrough
What secrets lie within the mysterious radioactive area known as The Zone? We'll help you find out in GameSpot's Walkthrough to S.T.A.L.K.E.R.: Shadow of Chernobyl.
Design: Randall Montanari
The gaming world is no stranger to delays, with high-profile titles like Halo 2, Half-Life 2, and Duke Nukem Forever being delayed sometimes years beyond their original release dates. S.T.A.L.K.E.R.: Shadow of Chernobyl (referred to hereafter as simply Stalker, for our sanity's sake) from Ukrainian developer GSC Game World, is another one of those titles, having initially been announced as a title way back in 2001. Originally set to be released in 2003, the game has finally arrived on shelves.
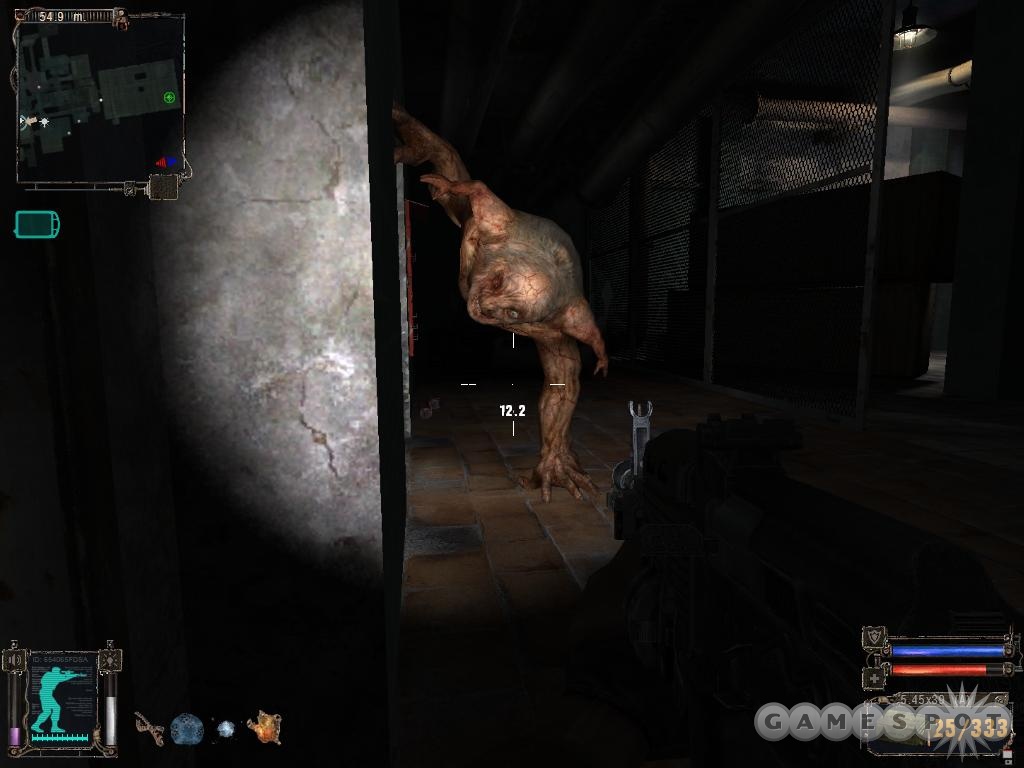
Stalker is a post-apocalyptic first-person-shooter set in the area around the Chernobyl nuclear reactor. After the reactor went critical in 1986, it flooded the surrounding area with radiation. In the game's storyline, further accidents expanded the radiation zone outward by a few kilometers, scaring the citizens in the surrounding countryside into abandoning the area. However, rumors of great treasures in the area around Chernobyl - now simply called The Zone - lured in numerous mercenaries, called stalkers, who braved the mutants and radiation in the Zone in the hopes of striking it rich.
Fittingly enough for a game originally subtitled "Oblivion Lost", Stalker plays out much like an Elder Scrolls game; you receive quests from various questgivers, and can choose to ignore them or complete them as you see fit, or simply explore the countryside. However, Stalker is a bit more focused than Oblivion was, and, in fact, there's no levelling-up to be done at all, and no experience to gain; everything you do in Stalker is based on the equipment that you find and the pure skill that you can bring to the combat.
Our game guide to Stalker is intended to help you get the most out of the game's main storyline. Read on for a bevy of tips on the game and a walkthrough to boot!
General Tips
Stashes
Stashes are going to be the source of a lot of loot for you during your time around Chernobyl. The basic process is this: you kill an enemy, then check their body. You’ll get a PDA message indicating that they had information about a stash on them. You check your map and look for a purple triangle marking the location of the stash, look around a bit for a backpack or some other item that could hold loot (sometimes it’s a rusty pipe, for instance), then open it up and grab the loot.
Unfortunately, stashes are kind of wonky and weird in this game. Since you’re going to be killing hundreds of enemies during the game, and there are only so many stash locations to go around, sometimes you’ll be heading to the same stash twice. Sometimes, if you don’t take everything out of a stash, it won’t be refilled, even if you find the stash indicator on another soldier. Sometimes you’ll empty out a stash and the icon will still be there on your map, for whatever reason. Sometimes you’ll be pointed towards stash locations only to find nothing at the marker.
If you want to make the most of stashes, you should try to make your way to them as soon as possible after they become available to you. Don’t let them distract you from your storyline quests, though - stashes aren’t that important. But when you do reach one, open it up and take everything inside. Even if you don’t need any of the items in there, it’s better to nab everything then dump anything you don’t need on the ground, rather than keep it in the stash. That way, if you nab the same stash’s location on another body, it might wind up getting refilled with new goodies.
As noted, stashes aren’t particularly worth tracking down if they’re going to be well out of your way. Early in the game, they’re worth checking out, since they’ll net you more first aid kits and ammo, but later on, you’re going to be able to find everything you really need off the bodies of your enemies (ammo, first aid supplies, weapons) or floating around on the ground (artifacts).
Money And Supplies
After playing a game like Oblivion, which is superficially similar to Stalker in many ways, you may think that money will wind up being important in Stalker. Unfortunately, it really isn’t; as mentioned above, you’re going to wind up finding most of the stuff that you really need on the bodies of enemies that you’ve slain.
There are only three main traders in the game: Sid near the beginning, Barkeep in the Bar territory, and Prof. Sakharov in Yantar. Each of these fellows will be willing to buy most of what you’re capable of selling, and will have unlimited funds to buy what you offer, whereas the neutral and friendly stalkers and soldiers throughout the realms will generally only buy your first aid kits and, helpfully, the artifacts that you find.
Still, though, it’s worth building up a little bankroll for emergencies, or for when you happen to spot a 30,000 RU suit for sale at Professor Sakharov’s. The most profitable items to sell are artifacts, which you’ll find in greater quantities when you finally make it north into the Garbage sector and into the sectors beyond. Each artifact will net you at least 1,000 RU, with the more valuable ones being worth 5,000 total. Luckily, most stalkers and soldiers will be willing to trade for them, so you don’t have to lug them back to a trader.
Luckily for you, in most cases, either something will be useful or it won’t be, so there’s no real reason to keep supplies hidden away. If you want to do so, though, find an empty stash box near your stomping grounds and keep your supplies in that. They won’t disappear so long as you keep them in a box. Even if you decide to dump them on the ground somewhere, they seem to be persistent for a good long time.
Sprinting And Endurance
One of the most useful abilities you have in the game is the ability to sprint. It’ll let you move much more rapidly than you normally would, which is going to be important when you consider that you move glacially slow at default speeds. You won’t, however, be able to run forever, since your endurance meter will drain as you do so.
The endurance meter’s draining will depend on a couple of factors, the most important of which is how much weight you’re carrying around. If you’re carrying almost nothing in your pack, then you’ll be able to run for a long distance before you tire out. If you’re carrying close to your 50 kilogram weight restriction, though, you’ll tire much more quickly. If you go over the 50 kilogram weight limit, then you’ll be unable to run for more than a couple of seconds before you tire out. If you go over 60 kg or so, you won’t be able to move at all. For most of the early game, you’re going to want to keep your pack down to around 40 kg or less, just so that you’re able to run farther distances without tiring.
Later in the game, you’ll want to keep an eye out for endurance-boosting artifacts, such as Moonlights, Flashes, and Sparklers. These give large boosts to your endurance rating, eventually allowing you to sprint as long as you like without slowing. They typically glow blue or bluish white when seen, so keep an eye out for them!
Artifacts & Dealing With Radiation
The main reason the Zone is populated is because Stalkers wish to collect artifacts and sell them for profit. However, the artifacts that you find can be affixed to your belt to net you a constant benefit, but usually at the cost of a constant negative effect, as well.
Early on in the game, you’re mostly going to be finding mild artifacts that typically add a bit of a bonus to your Rupture or Bulletproof Cap ratings at the expense of a constant exposure to radiation. That’s obviously not something you’re going to find useful at all, so sell these when you find someone willing to buy them.
In general, the two types of artifacts that we found most useful were the anti-radiation artifacts (Thorns, Crystals, and so on) as well as the plus-endurance ones. Anti-rad artifacts come with two side effects: increased bleeding, or reduced endurance. Try to stick to the ones that increase the effects of bleeding if possible. You’ll have plenty of bandages to reduce your bleeding when you get struck by bullets, but reducing your endurance will simply cripple your ability to run around.
Plus-endurance artifacts usually come with penalties to your electrical exposure resistance, but that’s a relatively minor worry in the game, unless you’re constantly running into anomalies.
Anomalies
Anomalies persist throughout the Zone, and are going to be a minor annoyance to you throughout the game. There are a variety of anomalies around, which will update in your PDA’s Encyclopedia section when you encounter them, or shortly thereafter. The most dangerous one to you will usually be the Vortex, which is a suction anomaly that will suck you into its heart as you pass by and cause damage through minor explosions. It’s possible to escape from a Vortex after getting caught up, by running or jumping out of its pull, but it’s difficult to do so. It’s best to simply avoid them altogether; they’re tough to spot, but if you look close, you’ll see the air pulsating around them. This is also true of the Whirligig and Springboard anomalies.
Keep in mind that your anomaly detector will start to click when you near an anomaly, even if it’s not of the easily-seen sort. You also have an unlimited supply of bolts (6 button) to throw around to see if anomalies are present, but they’re usually unnecessary.
Artifacts are usually to be found near dense concentrations of anomalies, which can sometimes make it lucrative to explore near them. Just try not to sprint full-bore when you’re near anomalies, as it’s easy to run straight into a Vortex and get killed for your carelessness.
Combat Tips
One of the best aspects of Stalker is its combat; it’s satisfying and challenging, although periodically frustrating, as well. Here are some tips to help you make the most of the game.
Quicksave Often!
You have a quicksave button, as you’d expect. Hit F6 to quicksave your game and F7 to quickload when you die. In tense firefights, quicksaving can save you a lot of headaches. Just don’t forget to make regular main saves, as well; try to make a new full save each time you enter a new zone, at a minimum. And try not to quicksave unless you're absolutely sure you're in a safe spot; if you quicksave just before someone shoots you in the back, then you might not have any option but to reload your previous full save.
Full Auto? Not Always
You also have a button that will allow you to switch the firing mode of the weapons that you encounter. By default, the 9 button will let you switch your firing mode. You'll see the firing mode in parentheses in the bottom right corner of the screen, just above your ammo count. It will either be an (A) or a number in parentheses, like (1). What this basically tells you is how many bullets will come out when you click on the fire button.
Not all weapons will feature firing modes, though; most of them will only let you fire once per each button click. This is going to be most useful when you're dealing with automatic rifles, then, which can generally be shifted from automatic fire (the (A) indicator) to single-shot or burst fire. (If the indicator is (1), then you will fire one bullet per shot; having it set to (2) or (3) will result in burst fire. Not all rifles are capable of burst fire, but all of them can flip between automatic and semi-automatic fire.)
Single-shot or semi-automatic fire will be most useful to you when attempting to take down opponents from a distance, as it's far more accurate than using automatic fire, both in terms of how close your bullets will hit in relation to your crosshair, and in terms of minimizing recoil. If multiple enemies are coming in close to you, though, then you can switch back to automatic fire in an attempt to lay out a spread of bullets for their lunching enjoyment. Make use of this switch often as the situation dictates!
BOOM Headshot!
Stalker has a decently realistic damage model for your enemies; when hit in the head, they'll almost always go down in one shot, excepting advanced enemies with helmets. Still, it's usually better to aim for headshots when possible, as most enemies can take multiple shots to the body without falling over.
If you're firing from long distance with a decently accurate weapon, then just try to get your enemy's head in your crosshair and fire away at them with rapid semi-automatic fire. Clicking rapidly will let you control your recoil better than if you were to use automatic fire. At medium distances, the choice between semi-automatic and automatic fire will usually depend on your weapon's recoil. Some weapons, like the GP 37, will have low enough recoil to make it somewhat easier to use automatic fire while zooming in your scope; there'll be slight recoil, but you'll be able to fire a few rounds at the target's head in the hopes that one of them will connect. At close range, try aiming just below your target's head with automatic fire. If the body shots don't kill him, then the recoil will often lift your gun so that it's aiming directly at your foe's head. Adjust your aiming based on the amount of recoil of your weapon.
Exterior Fighting
Fighting in the great outdoors can be a tricky proposition, depending on a number of factors: the number of enemies you're going up against, the types of weapons they're using, the type of weapon you're using, the amount of ammo you have to spare, and so on. That said, here are some basic tips to hopefully keep you alive.
Sprint Between Cover: Run. Not necessarily away from your enemies, but towards cover. If your foes spot you from a long ways away and open fire, then you'll be at a marked disadvantage. While your enemies might not be accurate from long range, they'll have the advantage of infinite bullets and strength of numbers, so they'll be able to whittle down your health from long range while you struggle to hit them.

So, try to close in on your foes whenever possible. Luckily, in the great outdoors, there will usually be plenty of cover for you to use, so get used to sprinting from cover to cover until you get within a decent firing range. If you sprint out from one piece of cover to another, you may get hit by a bullet or two; these will stop you from sprinting, but if you simply hit the button again, you'll resume running. Keep going until you manage to hit a piece of cover that satisfies you and allows you to fire at your foes from a range that will let you actually hit them.
Duck: Well, duh. You have a crouch key in the game here, which will let you crouch down a bit before firing. You also have a second crouch key that can only be activated when you're already using the first, normal crouch key; it lets you crouch down even lower. And that's awesome.
Anyway, ducking down a bit will make you a smaller target, making it more difficult for enemies to hit you. It seems to have a fairly small effect on accuracy, as well. There isn't any way to go prone, as far as we can tell, which is too bad.
Know When To Close In: Some enemies will switch weapons if you get close enough to them. If a soldier with a sniper rifle or a rocket launcher is giving you fits, try to sprint close to them and engage them at close range. Usually this will force them to switch to a pistol and engage you with that, reducing their effectiveness quite a bit.
Interior Fighting
You'll be doing plenty of fighting inside structures and facilities as you proceed through the game, which bring their own unique challenges. Here are some tips to help you out.
Use Grenades: You'll find a fair number of grenades on the bodies of soldiers that you kill. Pick them up and save them for interior fighting. Grenades can be bounced off of walls and around corners, and are especially helpful when you have three or four soldiers to deal with at one time. Soldiers will spread out when a grenade lands near them, so be ready for that by switching to another weapon after throwing your grenade.
Grenades are, by default, bound to the 4 key.
Lure Your Foes To You: When dealing with enemies in tight corridors, it can help to be a little noisy. Generally it's easier to tag enemies as they come around corners looking for you; you'll know approximately where their head will be, and will be able to snap-fire more quickly than they'll likely be able to react to. If you have a shotgun, you can blast them in the chest for an instant kill in most cases.
To lure an enemy out to you, simply fire at them a few times, then duck back behind a corner and wait for them to come. Not all enemies will actually follow you around a corner and let you take them down; if they don't, though, then see our advice about bouncing grenades off of walls above.
Weapon Types
There are a number of different types of weapons in Stalker. Here’s a rundown on the basic sorts.
Knife: You start the game with a basic knife as your buddy, bound to the 1 key. It’s not going to be of much use to you during the game, unless you want to smash crates to see what’s inside of them. You can still use it to get kills on enemies, if you wish; try rushing them while they reload and slicing them. This is most useful on zombified enemies, who seem to be less resistant to knife attacks than normal humans.
Pistols: You’re going to start the game with no weapons at all, save the knife, but you’ll soon find a pistol. You won’t be using it very long, but your pistol will still be a trusty sidekick for the first hour or so of the game, allowing you to rapidly shoot enemies while conserving ammo for your more significant weapons. Go for the headshots when you’re up close with your pistol; at greater distances, the inaccuracy of a pistol will force you to shoot the body if you want to hit your target at all.
After you grab enough ammo to consistently be able to fire an SMG or assault rifle, you can feel free to drop your pistol and all its ammo. You'll find better pistols as you proceed through the game, but they'll almost always wind up being dead weight after you get an assault rifle.
Shotguns: There are only a few different types of shotguns in the game, but you’ll be using the first one, a simple double-barrelled sawed-off shottie, the most. It pops up fairly early on in your first little skirmish, and it’ll be a powerful tool for popping fools from then on. Like you might expect, shotguns exchange accuracy for power; they can’t hit anything farther than a few meters away with any reliability, but when you get someone up close to you, they’ll put him down right quick.
Shotguns are thus best used indoors, in small buildings or in the larger facilities that you’ll eventually be entering. If you can get an enemy’s attention and lure him towards you, you can simply wait for him to come around a corner and blast him a couple times for a quick kill. They work best on the lightly armored foes you'll be encountering early in the game; by the time you start seeing exoskeleton-using enemies from Monolith or Freedom, though, you'll find shotgun effectiveness to be greatly reduced, with many enemies able to shrug off a full clip of six shotgun shells. If you're really good at getting headshots, then the pump-action shotguns available later in the game might be worth your while, but the lengthy reload animations will probably allow enemies to kill you off with impunity.
Submachineguns: Early in the game, you'll run across a number of submachineguns, such as the Viper 5, mostly in the hands of the military or well-armed bandits. These weapons aren't very accurate, but can quickly put down lightly armored enemies with body shots or a well-aimed headshot.
Assault Rifles: The mainstay of your arsenal will be the assault rifle. These versatile weapons can be shifted from semi-automatic to automatic fire, letting you go from accurately getting headshots at medium range to simply blasting fools with automatic fire when they get too close.
There are a huge array of assault rifles in the game, with the highlight probably being the GP 37 that you'll start running across when you reach the Army Warehouses district. With a built-in scope and low recoil, you're going to want to be using that weapon for most of the rest of the game. Up until that point, you'll be finding new assault rifles to use every couple hours of gameplay or so. When deciding whether or not to use a new weapon that you've discovered, check the stats: weigh differences in accuracy and ammunition before making the switch. Sometimes it's best to simply pass up a new weapon and collect the ammo for it until you have enough to ensure that you can actually using it. Dropping your old weapon and 300 rounds of ammo for a new gun that only has 20 rounds in it is usually a bad idea. You'll usually want to have at least 100-200 rounds of ammo for a weapon before you can feel comfortable calling it your mainstay.

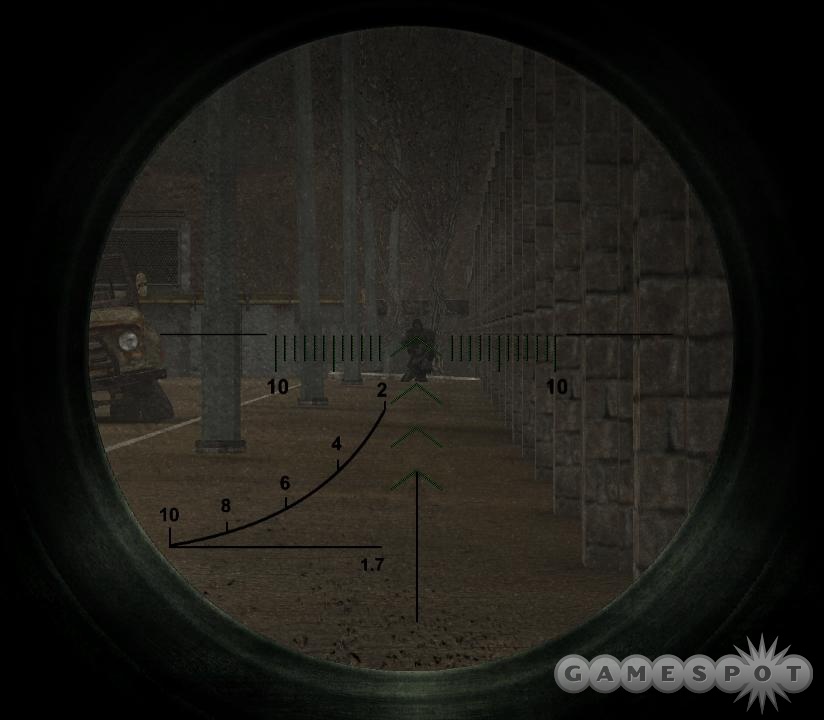
Sniper Rifles: You'll start running across sniper rifles in decent quantities when you reach the Army Warehouses and Red Forest districts. These are unmatched for accuracy, usually, allowing you to get somewhere in the vicinity of your target's head from a good distance away. Ammunition will be fairly sparse, though, so you won't want to be using sniper rifles on every foe you see. In most cases you'll simply want to save your ammo for enemy snipers that are hidden up in towers or other high elevations. The only true sci-fi gun in the game, the gauss rifle/railgun, is considered a sniper rifle, but you won't actually find it until it'll probably be too late for you to make much use of it.
When carrying a sniper rifle, your ability to aim will be slowed down a bit (to make it easier to aim at distant targets), and you also will be prevented from running for some reason.
Rocket Launchers: There are very few rocket launchers in the game, with perhaps only a dozen rounds of ammo or so available for them in total. They're powerful, of course, assuming you manage to aim them at a crowd of foes, but they're also heavy and cumbersome to carry around while you wait for the perfect opportunity to use them. We never really bothered with them, ourselves, mostly due to the weight issue.
Walkthrough
On Side Missions
We've made a deliberate choice not to cover most of the side missions that are offered to you in Stalker, and will concentrate solely on the main storyline quests that come your way. There are a few reasons for this, including the fact that many of the side missions are either largely irrelevant (in that they offer cash in a game with very few things to buy), are easily completed (as when you're told to kill someone and are told precisely where he's located), or are kind of broken. We've encountered missions where we were told to find an item and pointed to a location, only to discover that there was no item to be found; we also had one mission where we successfully recovered an item and brought it back to the questgiver, only to discover that he didn't offer us any way to complete the quest in his dialogue box. Fun!
Anyway, feel free to attempt these side quests as you like. You can find them at Sidorivich's hideout at the beginning of the game, from a couple of stalkers in the camp nearby, and at the Bar in the middle of the game. You'll also occasionally run across side missions as you run around the game world; usually these are "defend the camp" missions which require you to kill a number of incoming enemies. Sometimes these can only be turned into characters like Sid who are going to be inconvenient to reach.
Cordon Quests
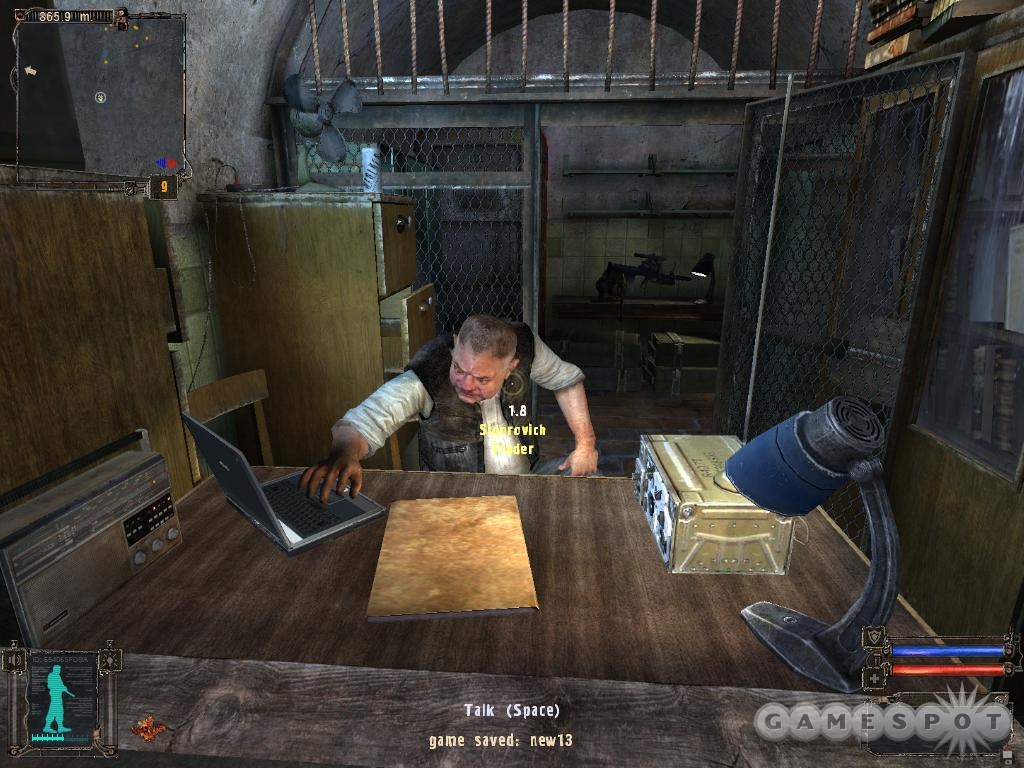
After watching the opening cinema here, you wake up in front of a character called Sidorivich. You owe him for saving your life, so you’re going to have to help him out. Sidorivich is the only trader you’ll run across for a while, meaning that he’ll be the only one you can sell guns to. Every bandit in the area will buy health items from you, but guns have to go through Sidorivich (at a marked down price, of course). We're going to refer to Sidorivich as Sid for the bulk of this guide.
If this is your first play-through, tell him to treat you like a rookie for some tutorials. Otherwise, listen to what he has to say and accept your first mission, aside from the overarcing Kill Strelok goal.
Special Mission: Get Information From The Scout
Talk to Wolf
Wolf is located in the small camp near where you start the game. He’ll be marked on your map with a target icon. Find him and talk to him and learn about your next goal. You can talk to him again for another mission afterwards.
Meet With Wolf’s People
After you accept the second part of this mission from Wolf, he’ll give you a pistol, some ammo, and tell you to meet his friends near the bandit hideout to the north.
Follow the road to the north, and you’ll come to Tolik, who’s lying by the side of it, writhing in pain. If you pick up the first aid kit next to the nearby corpse and give it to him, he’ll go back to camp and tell the people there that you’re a good guy at heart. Aww....
Anyway, search any grey dots on your minimap for items, assuming you can shoot off the animals that usually surround them. You may want to preserve your ammo until you meet up with Wolf’s folks. They should be denoted on your map by an arrow. Head there and talk to Petruha.
Eliminate The Bandits At The Car Park

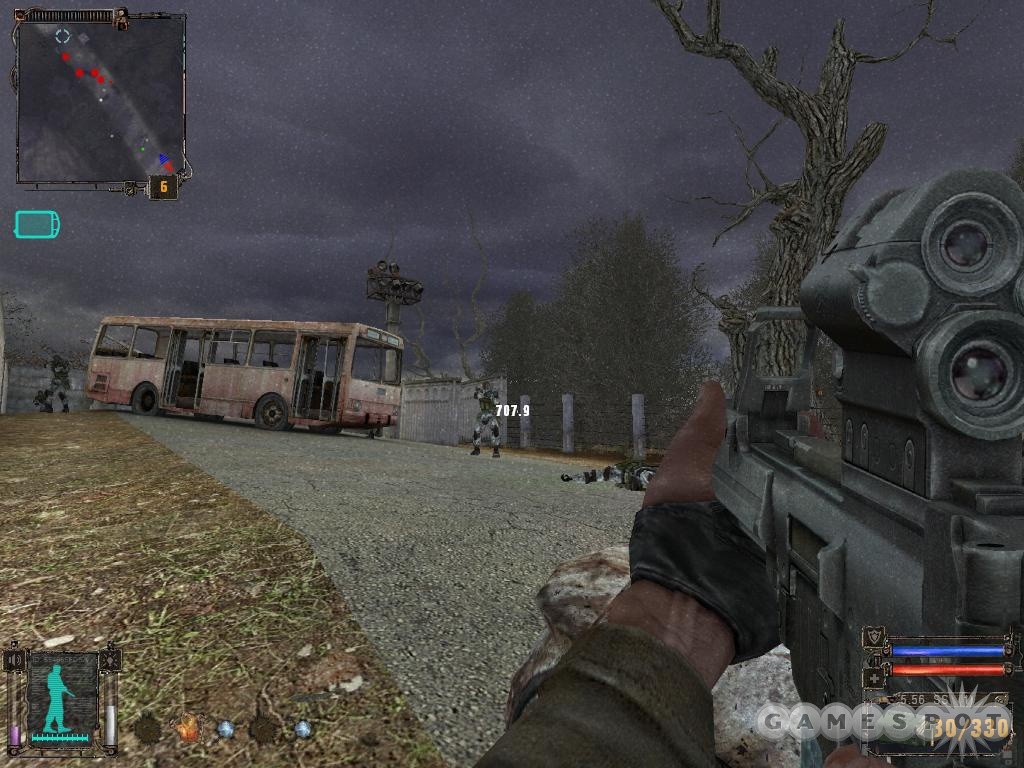
Ah, your first taste of combat. There are six or seven bandits in the car park, and you have three teammates here, so you’ll have to help out a bit if you want to take them out. Your pistol is a decent weapon, but it’s not very accurate, so you’ll need to get in rather close to make it work. Luckily for you, there are plenty of holes in the walls here that you can take advantage of. Try to flank some of the first soldiers you face off against while your teammates are firing away at them and pop them a few times in the back to take them down. If you’re in the clear, you can search the bodies until you find more pistol ammo or a shotgun and use that to sweep through the rest of the camp, killing bandits as you go. You do have support here, so if you need to, simply wait back in the back and let the soldiers and bandits kill each other off before cleaning up the mess.
Get the Flash Drive from Nimble
Nimble is hidden away in the multi-story building here. Find him and retrieve the flash drive from him. He’ll offer you a mission; you can either get it now, or later, when he returns to camp.
Take The Flash Drive To The Trader
Return to camp. Wolf will offer up a Jellyfish artifact as a reward if you speak to him. You can affix artifacts to your belt to net their benefits, but in this case, the radiation will slowly kill you, so just hold onto it for now, or sell it if you like. Return the flash drive to Sidorivich for his reward as well. You should have enough cash to buy a Fort12MK2 pistol from him, which is an upgrade over the guns you have now.
After you complete this mission, Sidorovich will offer you both "special missions" (which advance the plot of the game) and normal missions, which are simple objectives done for profit. The special missions are required to advance, while the normal missions will generally have a one-day timer on them. None of them are particularly difficult, but sometimes you may find yourself stuck with an uncompletable mission, if our experiences are any indication.
Special Mission: Find The Military Documents/Find Strelok
Sid thinks he might know how to track down Strelok, but he wants you to help him out. He wants you to head into a research lab far to the northwest and find some documents for him. This is going to be a lengthy quest, but there’s no time limit, so feel free to do other quests at the same time. Note that these are technically separate quests, but that they advance in more or less the same fashion in the same places, so we’ll group them together.
Meet The Journeyman

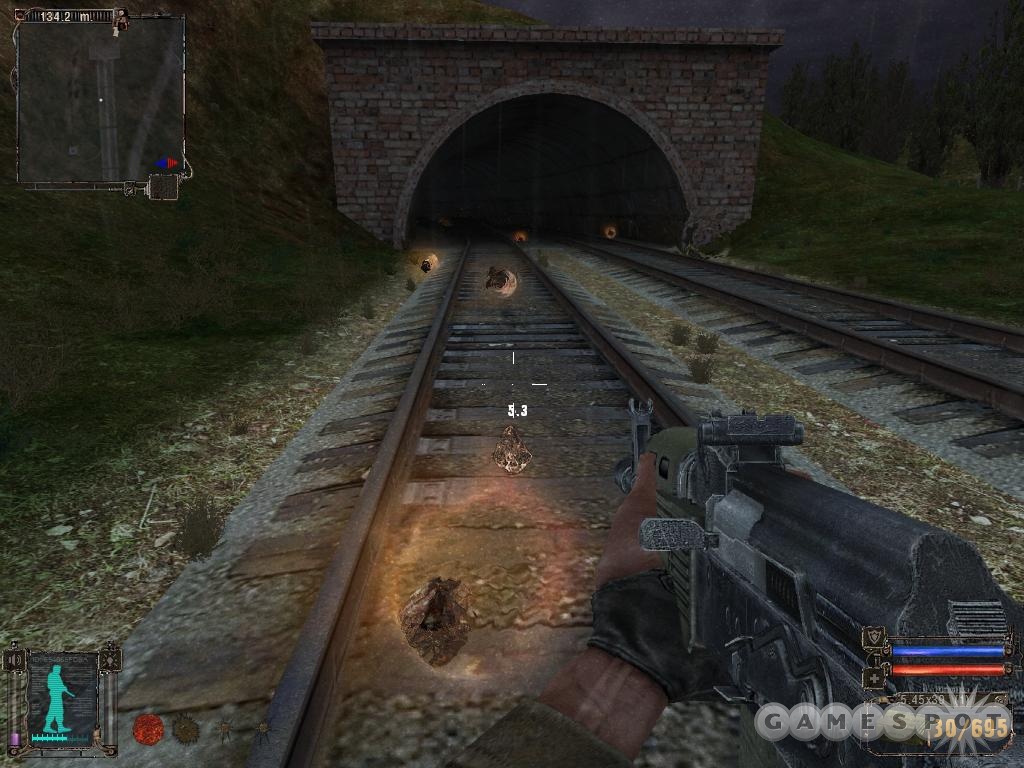
You’re supposed to meet a contact at the tunnel leading underneath the railroad tracks, but he’s unfortunately dead. His PDA purports to tell you about how to avoid the anomolies in the tunnel, but all it really says is that they move. Well, duh.
If you save your game beforehand, you can make it through the tunnel without too many problems. The anomolies do indeed move, first appear near the mouth of the tunnel, then slowly moving away from it before disappearing and starting over. If you follow them, moving super slow and not attempting to run through them, you can make it to the midpoint of the tunnel. The second half of the tunnel is the same deal, but the last anomaly here is floating above the ground, making it a bit difficult to see. Be sure there’s nothing there before sprinting out of the tunnel.
If you really don’t want to deal with the anomalies here, you can head to the main military checkpoint underneath the point where the bridge broke in two. If the soldiers there are shooting at other stalkers, they’ll be hostile to you, too, but if they’re simply standing there and minding their own business, you can pay them 500 RU to gain your passage. Be sure to loot their little camp in the middle of the bridge to offset the cost. This might sound like a gyp, but purchasing your immunity to the gunfire of the soldiers will let you watch as they skirmish with the stalkers, and pick up the weapons that the fallen combatants drop.
Help Fox
When you pass through the railway embankment, Sid will tell you of a stalker named Fox, who apparently knows something of Strelok. He’s in a nearby house, lying wounded on the floor. You need a medkit to heal him, so if you don’t have one, you might have to return to Sid and buy one.
Although his text screen will probably pass by too quickly for you to see, Fox will point you to a man named Gray, who’s up north in the Garbage zone. Getting there will require you to head north, through a bandit camp. It’ll be a tough fight, so you may want to complete any other missions you’re on (if possible) before heading up that way.
Reach the Checkpoint
The checkpoint leading to the Garbage area, to the north, is covered with bandits that will be hostile to you on sight. There’s no way to really avoid them, so gird yourself for a fight (you may want to buy some first aid kits from Sid), gather your weapons and ammo, and head up north. If you have an smg of whatever sort, be sure to switch it to single-fire mode (with the 0 or 9 keys) to increase its accuracy at long range.
The checkpoint itself is one small building, but there’s a truck in front of it that will provide you a bit of cover as you approach. Depending on the positions of the bandits, you may find your approach to be fairly easy. Many of them will usually be out in the woods to the south of the checkpoint, allowing you to sneak up by sprinting along the western side of the road. They may take a potshot or two at you as you run past, but they usually won’t follow you. We’ve seen anywhere from two to 10 bandits waiting inside the building here, though, so your journey may not be over yet. If you do manage to aggravate the whole bunch of bandits, get inside the building here if possible and start blast them as they come in with your shotgun.
If you find this fight to be overwhelmingly difficult, you may simply want to wait a while and come back, and hope that the bandits are in better positions.
The Garbage

Many of the junkpiles here are highly radioactive, so don’t stray too far from the road if possible. To the north, you can find an outpost of the Duty, a set of military guards for the Zone. They won’t be very friendly now, but you’ll get past them later.
Speak With Gray
The stalker that Fox wants you to speak to is located north, along the road. You’ll probably have to kill off or run away from some bandits to reach him. When you do reach the factory that his marker is located in, you’ll be told to help the stalkers there fight off some bandits that will attack. Do so, and Gray will deign to speak to you. As you might expect from the other guys, he doesn’t have much to offer you at this point, and instead sends you to speak with a stalker named Mole.
Mole is over in the Agropom Research Institute area, so you’ll need to head west from the hangar that Gray is in in order to move out there. There will be plenty of bandits around, and you’ll probably have to fight them solo in order to move on.
Agropom Research Institute
Meet With Mole
As soon as you enter this zone, a stalker will tell you that a military air assault force is about to land near Mole’s group, for some reason or another. If you want to talk to Mole, it sounds like you’ll have to assist him in his defense.
There are a number of quest objectives here, but they all basically boil down to the same thing: you have to prevent mole from getting killed by the paratroopers that are coming in to get him. Why are they after him? Who knows!
Saving Mole
Anyway, heading in via the main entrance is going to be a pain, so you will probably want to head around to the north side of the entrance and wrap around. There are a couple of optional entrances there which will let you sneak into the facility and hopefully find a ladder leading up to a rooftop, from which you can blast the soldiers as they engage the stalkers.

Your goal, again, is to kill all of the soldiers in the area, but take your time; Mole is actually holed up in a building and apparently can’t be killed. All of the soldiers here wield Akm 74/2 assault rifles, which are big and mean, so you’ll want to grab one of them and as much ammo as you can safely carry. It has a lot of kick, so it might not be the best weapon for dealing with distant enemies, but it’ll blast a hole in anything that gets within range.
Anyway, when all of the soldiers here are dead, Mole will exit his building and, when you get near him, move outside to a sewer entrance, where Strelok’s stash is apparently located. Be sure to speak to Mole before heading in to wrap up his related quest and move on to the next section. You appear to be able to screw up your game somewhat if you go into the sewers without speaking to him.
Find Strelok’s Group’s Stash
Head into the sewers, and be ready for some fighting. There should be a group of bandits near the entrance to the zone that you will need to take out, but it can be difficult to see in the dark. Don’t forget that you do, indeed, have a flashlight (default key is L).

After killing the initial batch of bandits, ignore the hallway with the electrical anomoly in it and head west, down the spiral staircase. There’s a bunch of acidic anomolies here, but they’re easy enough to avoid. When you reach the larger room that’s filled with machinery, check out the elevated platform on the western side; you should be able to find an Urchin artifact there, that’ll net you -30 Rad while worn. It’ll increase your bleeding, though, so don’t wear it until you need to.
Near this area there are a couple of nested, curved hallways that have a military-grade guard. When you start to see the number of nearby PDA’s jump up, you’ll know you’re about to face some opposition, so be careful! These guys are clustered around the entrance to Strelok’s stash, which is in the semi-circular inner hallway, near the southern end. If you see a pile of boxes near a hole in the wall, peek in to find a ladder and climb up to find the stash. You’ll find a Fireball artifact here, which also reduces radiation, as well as a small flash drive in a hole in the wall behind the map board, leading to the "Find Ghost" mission. That has the information you need; now you just need to get out of the underground.
Find a Way Out Of The Underground
Follow the path leading on from the stash and fight off more soldiers. You’ll eventually reach the end of the road, but a psi-mutant will attack you before you reach the ladder. Kill it if you want - the psi-attacks are super-annoying - or you can just run to the ladder leading up out of the ground and move on.
Mission: Find The Military’s Documents
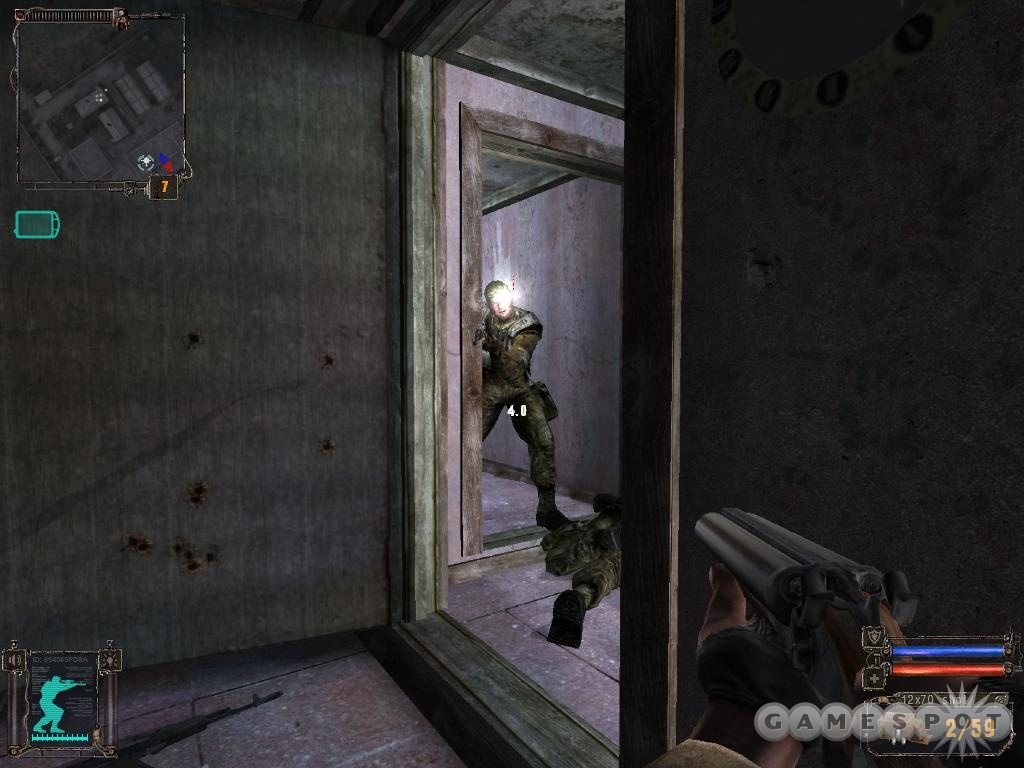
The exit to the underground will place you right smack in the middle of the Agropom Research Institute headquarters, which is where you need to be to find the military documents that Sid wants. It’s also populated by perhaps a dozen guards or so, so be careful! We found it best to head into one of the barracks just to the southeast of the exit to the underground and wait there for the soldiers to arrive. Since there’s only one entrance, you can pop them with some shotgun love as they venture in.

The documents that you want are on the third floor of the largest building here. You can also see a loudspeaker on the roof from down below; shoot it, if you like, to turn off the alarms. After reaching the third floor and picking up the briefcase (expect some soldiers to be guarding it), you’ll have to make your way back downstairs. There doesn’t appear to be any other entrances or exits to the building aside from the main one (unless you’re willing to jump off the roof), so fight your way outside, exit the facility, and get the heck out of dodge.
Expect heavy resistance when attempting to leave the ARI zone. Keep in mind that you can switch firing modes with the 9 and 0 buttons. Switching your Akm 74/2 to single-shot mode will help you fire on enemies from long range.
To The Bar

Now that you have the military documents, head back to the Garbage. Sid will have arranged for passage through the Duty encampment to the north towards the Bar. Head that way and approach the Duty soldiers. You may have to help them eliminate the mutants that approach the camp, but when you speak to the guy near the gate, he’ll let you pass through to the Bar area.
When you reach the Bar zone, the first thing you’ll want to do is actually find the eponymous bar, where the Barkeep awaits the documents. He’ll hand you a free stalker suit here, which is a good thing, since it’ll greatly increase your resistance to most forms of damage, and has built-in radiation protection. The Barkeep will give you the next part of the quest: he wants you to find a second set of military documents, locked up in another facility. He’ll give you one of the keys required to enter, but the second key will need to be picked up from Borov. Your goal now is to reach the Dark Valley, which will require you to pass through the Garbage and head east.
The Dark Valley
Reaching the Dark Valley will require you to head through some irradiated segments of the Garbage. Your stalker suit will help you resist most of the rads, but you still might want to slip on an artifact that helps you resist the rads if need be.
The Dark Valley has plenty of artifacts lying around, as well as some special non-mission encounters. To the east, above the location marked Lab Entrance, you can find a rocket launcher with one round of ammo on the third floor of a large building. To the south, in the middle of a farm, a stalker will sell you a gauss rifle for 800 dollars, then scam you and refuse to hand over the merchandise. Feel free to kill the stalkers there if you like, but there’s no gauss rifle to be found.
When you reach the Dark Valley, a simple side mission will be offered to you. You can skip it if you like, but it will tie in with your main goal here, so we’ll go ahead and describe it.
Follow Bullet To Ambush Location

The first time you enter the Dark Valley, you’ll come across a Duty soldier who’s incapacitated a bandit. Apparently the gang of bandits have captured one of the Duty soldiers and will be holding him for ransom, but if you ambush them before they can reach safety, you can free the soldier and hopefully get rewarded.
When you reach the ambush point, wait across the road from Bullet, behind the small structure there. His soldier friend will be the first to enter your line of sight; two bandits will follow. Wait for Bullet to open fire, then take out the bandits. Speak to Bullet for your reward. He'll reward you with a PSO-1 Scope that can probably be attached to your rifle, assuming you're carrying the right kind.
After you complete the mission, speak to Borya for some more information regarding the factory where Borov is holed up. If you speak to him thoroughly, he’ll give you the "Free the Dutyer from the Bandit prison" mission.
Find The Documents / Free The Dutyer
Both of these missions can be performed at the same time. Before you head in, you might want to poke around the map a bit. You probably have plenty of stash markers around here, and there’s some decent stuff to be found. One item of particular note that’s not in a stash is an RPG-7u rocket launcher with one round of ammunition. It can be found on the top floor of the structure in the eastern side of the zone, surrounded by bandits.
Sneak Into The Base

The bandit base to your north is where you need to go to find the second key to the lab. There’s a pipe on the western side of it that will lead underneath the wall. Find it and head inside, then take a left to reach dry ground.
Take the Key From Borov
Borov is a bandit, and isn’t going to just hand the key over to you. You’re going to have to fight your way through plenty of soldiers in order to find him; he’s holed up in one of the buildings on the southern side of the little complex. He can be tough to locate since he’s on the second floor of the building, and his marker on your map might actually indicate that he’s outside, but he should be inside the building. It’s laid out like a level from a normal FPS, so you won’t be able to head directly towards him; you’ll have to enter from the north and fight your way through plenty of soldiers in order to reach him.When you reach the stairwell in the middle of the brick building, you can poke around a bit for the stairs leading down to find the Dutyer soldier, who’s being held in a prison in the basement. You need to flip the switch on the wall nearby with your use button to let him out. If you do so, though, he’ll pick up a gun and might help you out in the fights.
Anyway, Borov is located deep within the building here. He can be complicated to find, but you’ll probably wind up just running up some steps and getting blasted by soldiers; that’s when you’ll know he’s nearby. Find him, kill him, grab the key off of his body.
Exit the Base/Enter the Lab
You don’t need to exit the base via the marker pointed out on your map; anyway you can get out will work fine. Head to the south to reach the lab entrance; it’s in another set of buildings. Enter via the main entrance, head into the building on your left, then kill the soldiers around the bunks. The entrance is at the bottom of a set of steps inside the locked foyer-esque room to the right of the bunks.
X18
With both keys in your possession, you can head into the secure lab underneath the buildings. Your goal? Find more documents for Barkeep. As you poke around in the first few rooms, you’ll find a door locked with a keypad. You need to find the code for the door.

Poke around in the immediate vicinity until you find a locker room a very short distance away, just to the northeast of the keycarded door. Opening up all of the lockers here will reveal a Monolith Suit, which, despite not being worth as much, offers more protection to some forms of damage than your stalker suit does. You’ll also find an Akm 74/2 rifle with an underslung grenade launcher, along with a couple of grenades. Sweet. The default button to switch on your grenade launcher is V. You won't find many grenades to use here, so keep that in mind.
This is a fairly small upper level of the lab, but a dangerous one. There are numerous hazy anomolies scattered around that will burst into flames when you pass through them. Occasionally you can avoid the flames by simply sprinting through the anomolies. Regardless, if you poke around long enough, you’ll find the body of the worker. His PDA will reveal to you that the code to the door is 1243.
Heading Down
Go to the door and open it. When you reach the bottom of the stairs, you’ll notice that more of the objects here will fly through the air at you, seemingly at random. Don’t worry about them, though, as they only cause light damage. Be more wary of the rapidly moving electrical anomalies in the area.
If you head towards the green dot on your HUD after finding the second locked door, you’ll find that a Pseudogiant is blocking your path to the access code. You’ll feel it before you see it, as it shakes the floor when it walks and can slam its feet into the ground for an earthquake attack. Kill it by shooting it in the head, then find the dead scientist in the red suit to obtain the keycode for the door - 9524. The scientist should also have an IL 28 assault rifle on his person which you might want to keep, although ammo for it will currently be scarce. There should also be another rocket launcher on the ground nearby.
With the keycode in hand, return to the locked door and open it. Here’s where things get complicated. The, uh, entity that’s been throwing things at you this entire time is inside this room, even if you can’t see it. It will follow you with jets of flame and attempt to burn you, but you can avoid these if you stay mobile. There are some cabinets with goodies up the ramped exit to the main room; in the control room atop the little experimental area, you can find the documents that you’re looking for on a desk.
Escape!
Now that you’ve angered the entity here, it’ll hold the door shut and prevent you from leaving. It can be difficult to discern precisely what to do here, but what you need to do is find the entity and kill it. It can be seen floating around the room, a tiny bundle of orange sparkles, distinct from the jets of flame. Track it down, follow it around, and fill it with bullets. It might not look like you’re damaging it at first, but eventually it’ll explode, allowing you to leave the room.
When the cutscene ends, fight your way through the soldiers that come into the facility. Note that they carry the upgraded Obokan rifles, an upgrade to the Akm 74/2. Even if you’re still using the grenade launcher attachment, it’s probably worth making an upgrade here. You can right-click on the Akm to dismount the grenade launcher and affix it to another weapon, if you like.
Escape From Dark Valley
When you reach the exit to X18, the building will quickly be swarmed by soldiers. Don’t worry about fighting them, unless you want to; just sprint out of the front gates and hit the road. The only exit available to you at the moment is apparently the southern one, which will lead you back to the Cordon. You can return to Sid to pick up a side mission for a little cash.
Return To Barkeep
If you wish, you don’t need to speak to Sid, you can simply head north through the Garbage to the Bar area and return to the Barkeep. He’ll hand over a cool 10,000 cash for the documents, and refer you to another lab, named X16. Yay! Another fetch mission. The "Find the Family Rifle" mission from the guy named Hunter in the bar will overlap with this quest. When you reach the Wild Territory, keep in mind that the dot indicating the rifle's position is actually intended to be underground; you need to find a passage near the burning chopper to reach it.
Head northwest out of the Bar and into the Wild Territory at this point. As you do so, you’ll come under fire from snipers in the buildings to your west. You can either snipe them back, or simply run into the building underneath them and find the ladder leading up. The soldier near the ladder will have a new TRs 301 assault rifle, which is quite powerful, even if you don’t have enough ammo to use it yet. The snipers themselves will have older model rifles, but if you pick one up, you can detach the scope from it by right-clicking on it in your inventory and then attach it to another weapon.
The Wild Territory
As you exit through to the center of the Wild Territory, a gang of mercs will crash a military chopper and surround the science team that you’re supposed to be interfacing with. Your goal is to kill the mercs and reach Kruglov, one of the scientists here. The mercs are outfitted with the new TRs 301 rifle, so they’ll pack a punch, but when they go down, they’ll drop plenty of ammo for your new toy. One of the soldier will also drop a rocket launcher, so be thorough in your body searches.
The game doesn’t end if Kruglov dies, but you’ll presumably be rewarded if you manage to keep him alive. Begin by sprinting around the north side of the battlefield, near the electrical anomalies, until you reach Kruglov’s position on your map. You’ll be more capable of defending him from the incoming mercs if you stand near him. Start taking headshots at the soldiers, and when they die, collect their ammo before speaking to Kruglov.
Lead Kruglov to Yantar
Kruglov requests that you take him out to the Yantar part of the map nearby. He’ll start moving as soon as you talk to him and agree to the escort, so get moving!

You’ll have three battles to fight through here. The first two will occur when Kruglov ducks behind cover and tells you that people are following you, and indeed there will be in each instance. Kill off the mercs as they attempt to reach you. The third fight will occur after Kruglov yells "Ambush!" and cowers like a baby. These mercs won’t really attack you, and instead will wait for you to move ahead and kill them. Which works out well, all things considered.
Eventually you’ll reach a tunnel filled with Burner anomalies, where Kruglov wants you to go on ahead. If you need more ammo for your new rifle, feel free to backtrack and loot some bodies. The tunnel itself isn’t terrible bad; just stick to the white strip in the middle if possible and shoot any zombified stalkers that come at you. When you reach the end, Kruglov will come through as well. He’ll give you his flash drive, which he says the Barkeep will pay you for, and will promise you a scientific suit if you visit the scientific lab in Yantar. If you return the flash drive now, Barkeep will pay you 5,000 RU for it.
Yantar
Head down the road into Yantar and take a left into the swamp in front of you, and head towards the bunker-esque building there. When you reach the interior, Kruglov and Prof. Sakharov will be discussing the situation. If you speak to him, he should give you an ecologist suit that will greatly increase your resistance to radiation (but which will reduce your resistance to gunshots!). Accept the main task from him, and any others from him that you wish to accept, and then speak to Kruglov to move on to the next task at hand. In order to reach X16, you’ll need to help the scientists develop some kind of psi-armor to protect you from the effects of the creatures inside.
Escort Kruglov To The Measurement Site

This is a pretty simple escort mission. Kruglov will head to a sewer pipe near the bunker and start to take rad readings. Stay ahead of him as you proceed through the tunnel (keeping your bulletproof armor on) and wade through the soldiers. When you reach the far end of the tunnel, clear out any enemies, sit through the odd cutscene, then wake Kruglov up and hightail it back to the bunker. Sakharov will reward you with a psi-helmet, which should protect you from the effects that cause anyone who enters X16 to go insane. We can hope so, at any rate.
Search Vasiliev’s Body
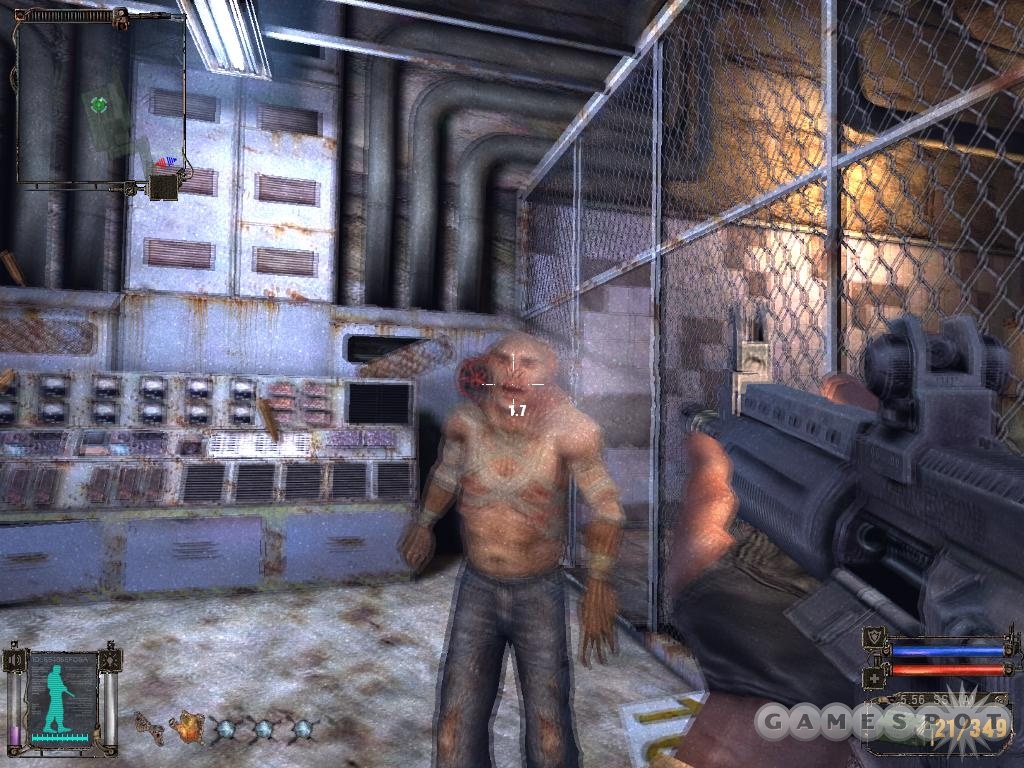
In order to get into the lab, you’ll need to find the documents on Vasiliev’s body. He’s a scientist that attempted to enter X16 with a stalker named Ghost (who just happens to be a comrade of Strelok’s), and never returned. Sakharov will point you towards his body, which lies near a helicopter to the west of the bunker. It’s surrounded by zombies, though, so be careful. Zombies, in case you haven’t noticed, are tougher to kill than normal opponents, but knife kills appear to be instant deaths, so if you can catch them reloading, feel free to rush them and knife them.
When you find Vasiliev’s body, you’ll hear his audio log, which will reveal how to enter the lab, or at least give you a marker for it on your map. You’ll have to clear out or avoid a number of zombies and snarks in the area around the entrance, so come fully loaded with ammo. Since you’re going to be inside a facility, purchasing the Chaser 13 shotgun from Sakharov might be worth your while here.
X16
After entering X16, proceed slowly but surely through the facility. There are plenty of zombies about, as well as more snarks. Snarks are quite dangerous in close quarters like these, as they can quickly sap your health and cause you to bleed out if they get in melee range of you, so keep your distance and nail them with machinegun fire.
Eventually you’ll come to a large control room, and the countdown that Sakharov warned you of will begin. You have around four minutes to scale the room and deactivate the emitter. Begin by finding the small control modules on each of the three first floors here and flipping the levers to shut down the machine, then reach the control room at the top of the chamber and flip the switch there to shut down the floating brain altogether.
Get the Documents from Ghost
Now that you have shut down the psi-emitter, you’re safe from zombification for the moment. The body of Ghost is nearby, and you need to search it for any relevant clues. Head there to find a controller patrolling nearby. These guys may be deadly on higher difficult levels, and they’re certainly annoying here, but if you rush them at full health and unload a clip from your rifle into their head, they’ll die relatively quickly.
After searching Ghost (his suit is neat, in that it features accelerated healing, but will offer less protection to you than the Monolith suit), grab the documents off of his body and drop through the hole in the northeastern corner of the room. You’ll eventually drop down into the sewers underneath the facility. Make your way out, being careful not to get squashed by the pseudogiant you encounter, and make your way back to the bunker. Sakharov will be happy with your progress, and will now sell you the SEVA suit, which is essentially a combination of the radiation protections of the science suit and the physical protections of the stalker suits you’ve been wearing. Nice!
Return to Barkeep
You have two main storyline-related missions now: return to Barkeep with the documents, and meet with Guide in the Cordon. We’ll start with the Barkeep, since he’s on the way back to the Guide. Head back through the Wild Territory, first off. When you spot the mercs atop the building in your path, head up that way and kill them off to find a scope for your TRS 301 rifle.
When you return to the Barkeep, he’ll tell you about the Brain Scorcher, which is apparently located to the north, and which protects the center of the Zone from intrusion. You can head that way and start up that quest if you like, but don’t forget that you also have the Find the Guide quest as well, which will take you down to the Cordon.
Quest: Find The Guide
Guide is located in the Cordon area, in one of the huts near the rail crossing. If you speak to him, he’ll give you a simple message: to meet the Doctor, you have to find Strelok’s secret hiding place. Since you claimed to be coming from Ghost, you obviously already know where it is...
Finding The Doctor
Well, luckily for you, you do. Return to Agropom and head into the sewers again, making your way back to where you found Strelok’s flash drive. If you do so, you’ll find the Doctor, who, shockingly enough, calls you Strelok! Couldn’t see that one coming, no sir!
The Doc will give you information on how to access the controls that will lead you to the Monolith. That won’t occur until later on, though; for now, you have to head north and deactivate the Brain Scorcher.
Quest: Turn Off The Brain Scorcher
Barkeep will have pointed you towards the leader of the Duty in the Army Warehouses district, who’ll have more information for you and perhaps a quest or two. Be sure to go back and see Guide in the Cordon district and complete his quest if you haven’t done so yet!
Army Warehouses
If you skipped to this section of the guide from the table of contents, then be sure to do the Find The Guide quest (listed on the page previous to this) before proceeding on through this zone. You can always return and do it later, but it'll be more difficult to walk backwards.
What Barkeep didn’t tell you was that there are actually two opposed questgivers in the Army Warehouses district. In the southwestern corner of the district, to the right of the road as you enter the zone, will be a small farmhouse with Duty officers in it, while the main army warehouses will feature a large contingent of Freedom soldiers. You can speak to Skull at the Duty base to get quests from him, or head over to the warehouses and enter the central building to speak to Lukash, the main Freedom soldier. These questgivers are mutually exclusive; if you take a quest from one, you’re naturally going to be prevented from doing so from the other.
Your choice here is somewhat meaningless in the grand scheme of thing, but it does give you a chance to show off your combat acumen. We’ll cover both options.
Freedom Quests
None of these missions over a material reward; you simply get cash for your efforts.
Freedom Quest I: Destroy the Duty Company
After speaking to Lukash, he’ll tell you to speak to Max, who groups together a bunch of soldiers to the entrance to the facility. Max will guide you and the rest of the grunts around to the farmhouse, where you’ll assault the Duty officers. When you arrive, the Freedomers will attack the Dutyers, but the Duty soldiers won’t attack you until you open fire on them. That will allow you to approach them, throw a grenade or two at them, then run away and get behind cover. When one of the Freedom soldiers dies, grab their excellent GP 37 rifle and use that to help finish off the Duty soldiers, then return to Lukash.
Freedom Quest II: Kill The Rat

One of the Freedom soldiers is an informant, and Lukash wants him taken out. Before you kill him, though, he wants you to follow the rat to an abandoned farmhouse and see who he’s been airing the dirty laundry to.
When you get close to the farmhouse, you’ll have to sneak up enough to make the snitch start moving into the farm buildings. Just sneak up in crouch mode until he starts moving, then retreat a bit and try to get an eye on him with your binoculars. The closer you get to him, the more likely he is to open fire on you, which will prevent you from completing the mission.
Anyway, the soldier will eventually radio for his contact to arrive. When that happens, run into the building and kill him, then get ready to deal with his contact, who’ll be running down the road from the west, accompanied by a few bodyguards. Kill them all to complete the mission.
Freedom Quest III: Assist At Freedom’s Barrier Outpost
Head to the outpost and speak to Cap there. He’ll tell you that Monolith forces have been attempting to breach the barricade that the Freedom soldiers have set up, and that they’ll be attacking again soon. You’re to help drive them off. This can be a somewhat difficult fight, as the Monolith soldiers wield weapons similar to the Duty soldiers you fought recently, and it can be difficult to spot the enemies in the forest at night, but if you simply stay back behind a protective covering and take potshots at them as they arrive, you shouldn’t have too many problems surviving, even if it does wind up being a long fight.
When this is over, you can speak to Cap for a reward, and will be able to proceed on into the Red Forest zone, if you like.
Duty Quests
Quest I: Kill The Tower Sniper

The Duty soldiers in the farmhouse wish to deal with the Freedom soldiers in the warehouses, but they can’t move out of the farmhouse until they deal with the sniper in the tower nearby. So, they assign you the task of taking him out.
Your goal here is to kill the sniper without entering the compound here; doing so will cause all sorts of problems with scripting and the like. If you still have your TRS 301 rifle with a scope (which you should’ve obtained in the Wild Territory from one of the mercs atop a building), you can use that in single-fire mode to take down the sniper. Run to the northeast of Skull to reach the ruined cars there, find a good vantage point on the sniper, and put one in his head.
Quest II: Kill Lukash
Now that the Duty soldiers can move, they’re planning to blow a hole in the wall of the Freedom compound and wipe the area clean.
There are, unfortunately, any number of ways in which the scripting on this mission can break, so you’re going to have to be pretty lucky in order to actually beat it. If the soldier who lays the explosives at the wall gets shot through the wall by an enemy before he can set them, the mission will simply be screwed up. If one of the other soldiers happens to take out Lukash before you can, you’ll likely be unable to get credit for it. If Skull dies during the assault, you might not be able to move on in the quest chain, etc.

Your main goal here is to kill Lukash, but you’re also tasked with taking down three snipers here. There’s one off to the left, near the main entrance to the camp; one on an exposed tower near the middle of the camp; and one off to the right in another sniper’s roost. You have much better aim than your compatriots, so you should try to focus in on these guys and take them down before heading to the main building and taking out Lukash. There are around 25 soldiers in the area, though, so you’ll have your hands full, and as we mentioned, you probably won’t be able to get your reward for this.
It’s a tricky business, but if nothing else, you should at least attempt the mission and try to clear out the camp, even if you don’t wind up getting a reward for it. This is due to the fact that you’ll be able to pick up one of the excellent GP 37 rifles that the Freedom soldiers wield. These little guys use the same ammo as your older rifle probably does, but has a built-in scope and seems to deal more damage. You will also be able to walk around to the sniper towers and grab the SVUmk2 sniper rifles and the ammo for those, if you wish.
The Red Forest
Whether you attacked the Dutys or the Freedoms, you’ll need to head out to the northeast to reach the Red Forest. If you did wind up attacking the Freedom camp, the soldiers at the outpost nearby will likely be hostile to you, but they may have also wound up deserting their position to head back to the warehouses. Even if that’s the case, you will probably have to wind up fighting off a horde of Monolith soldiers as they attempt to flood into the zone.

When you do transfer into the Red Forest, you’ll be facing off against a small encampment of Monolith soldiers. Try to sneak up on them by crouching and getting close before throwing a grenade into the middle of them, then finishing them off with your rifle. As you proceed down the road here, watch out for snipers on either side! Check their bodies, and you should find a SVDm 2, an upgraded sniper rifle that uses the same ammo as the rifles that you’ve already been using.
You’ve got two ways to proceed here: along the road, or through the forest to the west. The road is more highly radioactive, and there are plenty of soldiers in your path, including a few more snipers and one that wields a rocket launcher. The forest is filled with anomalies and snarks, but if you hug the eastern wall, you should be able to avoid them.
Disable the Brain Scorcher
Time to find and disable the artifact that’s zombifying everyone that comes this way (except, apparently, for the Monolith soldiers). Both of the paths will eventually lead you to the same place: the base of a road that leads up to the mountainous area to the east, where the Brain Scorcher facility is located. Be careful of the explosive barrels the soldiers drop down at you as you ascend; be ready to nail them with gunfire before they reach you.

When you reach the facility, your first goal is to find the antennaes outside, but before you can do that, you’ll have a little housecleaning to do. Expect snipers in the towers and plenty of soldiers on the ground, as well as a lot of phantasmagoric shades that will run at you. You can shoot the shades to disperse them, but they appear to do no damage to you even when they hit, so don’t worry about them overmuch.
The snipers in the towers are easy enough to deal with, but some of them are spread out in hard-to-spot spaces, especially since your view is going to be bleached out. Use your binoculars to try and get a box around the ones that you can’t spot to countersnipe them. Or, if you’re reckless, you can try to just run towards the entrance to the underground bunker here. It’s located near the eastern wall of the base. If you spot the train tracks leading underground and can find the rail car located on the eastern side of the base here, you can take the ramp up into the car and then down into the hallway beyond.
Into The Facility
The Brain Scorcher facility is mostly empty, and is very linear, so don’t worry about taking a wrong turn. When you spot the nonfunctional cargo elevator, look for the stairwell nearby and take that down. There’ll be a codelocked door nearby; if you’ve been searching the bodies of the soldiers you’ve been killing, you may have the code in your PDA’s Diary section. It’s 342089 - the safe has a number of first aid kits, grenade, and some ammo.
Keep proceeding from there until you find a set of four generators. The last generator will have a stairwell nearby leading to a small corridor. Follow it, step onto the walkways, and flip the switch nearby to shut down the Brain Scorcher.
Escape!
Now comes the hard part: actually leaving the facility. Although it was fairly empty when you came through the first time. Now, however, between 25-30 soldiers are going to be blocking your exit. Backtrack slowly but surely through the facility, using doorways for cover, as you kill your way back out. Don’t forget to use some of the grenades that these guys carry; you can bounce them off of walls and around corners as you claw your way out.
When you reach the exterior of the facility again, the military faction will be waging an all-out war against the Monolith. Both will likely be hostile to you, so try to avoid the bloodshed by circling to the south and west along the walls until you reach the exit to the facility, then sprint back to the road leading down to the east. The Barkeep tells you that he’s holding up a group of Stalkers that are going to try and beat the rush north, which is open to exploration now that you’ve shut down the Brain Scorcher. Head north to the Priyat exit to meet up with them.
Pripyat

The stalkers are going to be right by the entrance of the zone here, and indeed they will help you proceed north through Damnation Alley. They aren’t going to take you far, but try to stick with them nonetheless, as they’ll point out snipers in the windows and on the rooftops of the buildings on either side of you. Quicksave as you proceed and reload if you get wasted. Eventually the stalkers will head into an underground carpark, where they’ll stop - you’ll have to go on alone.
Head north across the square after moving up the car ramp nearby, but be careful! Soldiers with gauss rifles will snipe you as you move; if you still have your sniper rifle handy, it’d be useful to take them out before proceeding onward.
Find the Secret Stash in the Hotel

If you talked to Guide in Cordon, then spoke to Doctor in the Agropom sewers, you should have this mission in your log. You’re supposed to reach a hotel in the Priyat district which lies directly north of the carpark that the Stalkers take shelter in. You should have a waypoint on your map for it, assuming you did, in fact, speak to Doctor. At any rate, you can head to the hotel, take the stairs up one floor, find the door on the western side of the hallway that can open, then take the Decoder and the Documents. The Decoder will apparently let you open a secret door in the Monolith control system. Presumably we’ll get to use it later on.
When you hit the hotel stash, you then have to find your way to the north, to the other marker point, that will lead you to Chernobyl itself. You have two basic options here: head up the eastern side of Pripyat, or the western side. Taking the western approach is the less confrontational, although there is a large group of Monolith soldiers inside a building worshiping a Moonlight artifact. Kill them and take it if you want to get +109 Endurance. Heading up the eastern side is much more dangerous, as there’s a soldier with a rocket launcher there, as well as another gauss-rifle wielding sniper in the distance who’s hard to hit.
Reach The Power Plant
After reaching the entrance to the stadium on the northern end of Pripyat, a bizarre little cutscene will occur, and you’ll actually have to deal with a loading screen that will shunt you off to a new area. The military and the Monolith factions are in all-out war outset the Chernobyl power plant, and neither of them are going to stop and verify your identity before taking you. (Although, even if they did verify your identity, they’d probably kill you anyway.)
Your goal now is to reach the entrance to Chernobyl, which can be difficult to do since your map doesn’t function very well here. You have to head far to the west to get there, but that can be difficult since most of the area in front of you as you enter the zone is open space, which will leave you open to sniper fire and the assaults of the helicopters that swoop in out of nowhere. To make matters a bit more difficult, you have a timer that starts counting down after you enter the zone, indicating that a "blowout" is about to occur. After you enter the zone, you have about five minutes before the countdown begins, and then five minutes for the countdown itself, which gives you around ten minutes all told to work through the area.
Chernobyl Exterior

If you want to avoid a fight here, try heading along the curved road to the northeast and avoiding most of the soldiers that way; there are powerful suction anomalies in that direction, though, so do your best to avoid them. If you don’t mind getting shot up a bit, you can just follow the fence to your left and proceed to the north. Both paths will lead to the same direction: a large railway gate leading off to the west, where the power plant itself is located.
See the large building on the north side of this road? That’s Chernobyl. See the buildings on the southern side of the road? That’s where annoying men with gauss rifles will be shooting at you from. Try to stick close to the northern building here; there’s plenty of small structures that will protect you from the sniper fire and the helicopter annoyances. Make your way along the path here, hugging the walls, until you reach the entrance to the facility, then dash to it and head inside. There’s a small hole with a ladder in it here; head towards it to reach the interior of Chernobyl. If you don’t make it to the end before the blowout timer counts all the way down, the entire area will be bathed in radiation, cooking you within another minute or so, even if you do manage to dose yourself with pills.
Chernobyl Interior
Many Monolith soldiers patrol the interior, with most of them wearing military exoskeletons. Although the first one you encounter drops a gauss rifle (likely the first one you’ll actually be able to pick up), it, and any other sniper rifles you have, won’t be of much use in the cramped quarters here. Best to stick with your GP 37, if you’re still using it, or another assault rifle, and go for headshots. Even the nice shotguns these guys drop won’t be of much help against their exoskeletons.
Now, if you wish, you can find an exoskeleton here of your own. If you follow the corridors in front of you, you’ll eventually note that it splits off into two directions. Through a door to your left, there’ll be a concentration of four or five soldiers, while around the corner to your right, there will be a couple soldiers with shotguns and a room full of vertical piping. In the corner of the piping room is a ladder leading downward. There’s a stash here with a bunch of ammo and an exoskeleton suit for you, but the exoskeleton suit weighs a full 15 kilograms, and only gives you a 30% radiation protection rating, meaning that you’ll get slowly roasted if you attempt to wear it, at least without a number of anti-rad artifacts on your belt.
After wading through the soldiers through the doorway, in the room that acts as their barracks, look around on the floor; one of them will likely have dropped an FT 200M rifle. It won’t have quite the same amount of accuracy as your GP 37, but will deal a bit more damage. The extra recoil might make it not worth your while; it’s up to you.
The Wish Granter

Anyway, adventure on until you reach a stairwell leading up to a set of square hallways that all connect to one another. There are two paths to take here. One, near the southeast corner of the hallways, will lead you up to the Wish Granter and one way to end of the game. Climb over the rubble and find the ladder leading upwards. When you enter the Wish Granter room, find the small, pulsating white teleporter and jump to it. It'll warp you to the top of the room. Follow the path in front of you around the room until you reach the Wish Granter, then touch it. It'll apparently give you different endings based on certain character attributes. We had over 200,000 RU on our character, so we got a rather negative ending based around our character's desire to be rich.
The Secret Lab
In the northern hallway, though, in the set of square hallways below the Wish Granter chamber, there’s a ladder in a doorway underneath a rotating yellow klaxon light. If you head up there, you’ll be able to use the electronic decoder you obtained in Pripyat. Head to the door up there, use it, then wait 30 seconds until it opens to head through. Soldiers will assault you while you’re waiting, spawned somehow by the Monolith, so hide behind the metal boxes near the door and keep them back with grenades until you can safely make it through to the Secret Lab. If you manage to duck behind the larger boxes, though, you can simply crouch down until the door opens; none of them will notice you and thus you won’t have to fight any of them.
The lab here is, again, full of enemies, and there are some annoyingly long hallways to fight through. After entering the level, you’re going to want to head down the hallway to your left first, so concentrate on taking out some of the soldiers there, then dashing forward to the small alcove across the hallway there, which you can use as cover. There are going to be gauss-rifle using soldiers firing on you from the far end of the hallway, so try to avoid exposing yourself as best you can.
When you enter the hallway to your left, you’ll have to start fighting your way to the corner of each hallway, taking right turns at each of them. Stick to the small off-rooms, but be aware that there are going to be soldiers in some of them, so quicksave often!
Eventually you will reach a control room off to the left of the set of hallways that you're exploring. Grenade out the soldiers inside and enter the small, darkened room here. If you want to visit any parts of the game before the end, then make a full save here, as the door will close behind you after you head through.
The True Endings
When you enter the final room here, the door shuts and you're stuck in a room with six or seven small purple contraptions sticking up out of the ground. Gosh, they look important! You should probably shoot them, then!
As you blast away at the pillars, flame anomalies will open up around you. Ignore them as best you can as you fire away at the pillars. When all of them are destroyed, you'll begin speaking with a Matrix-y fellow who will tell you a bit of the backstory behind your adventure thus far, then offer you two choices. If you agree to join the consciousness project, then the game will end with a cinematic cutscene. If you refuse, however...
Returning Control To Humanity
The consciousness group will teleport you outside of Chernobyl, into the "backyard" of the facility, so to speak. You'll be able to return to the interior zone, if you wish, but all you will find is a locked door.
Anyway, the field outside of where you're teleported is full of junk, and will soon be full of soldiers that will be teleported in to fight you. Protect yourself as best you can from their gunfire, shooting them if necessary, until you can reach another one of the little while teleportation devices here.
At this point, your adventure is only just beginning. Each of the little white teleporters will send you to another zone of the field that you're in. Your goal is to reach a teleporter, warp to another small area, clear it of enemies so that you can explore, find another teleporter, then repeat the process. Some of the teleporters are hidden from sight; for instance, one of them will require you to jump through a broken barricade atop a building and fall through the warp. Finding the warps can be difficult, as can surviving the enemy assaults.
After a long series of warps, though (perhaps 20 or more total), you will eventually warp right into a cutscene that apparently represents the "best" ending to the game.
Got a news tip or want to contact us directly? Email news@gamespot.com
Join the conversation