Metal Gear Solid: The Twin Snakes Walkthrough
This walkthrough to Silicon Knights' remake of the Hideo Kojima classic includes basic strategies, weapons and equipment lists, and a full walkthrough for the game. We've even integrated video clips into the guide to fully illustrate how to beat bosses and sneak by some sticky situations.
Design by James Cheung
At last, Solid Snake is back on Nintendo's side, having taken a leave for a number of years. The Twin Snakes is a remake of Metal Gear Solid, the classic game from legendary designer Hideo Kojima. Originally released on the Sony PlayStation, Metal Gear Solid is regarded as one of the first stealth games ever. Instead of controlling a seemingly invincible hero who can take on legions of heavily armed enemies, Solid Snake's primary skill is infiltration--breaking and entering while remaining unseen and undetected. You'll evade patrolling guards, duck under security cameras, and eliminate your foes quietly as you uncover the dark truth about your mission.
This GameSpot Game Guide to Metal Gear Solid: The Twin Snakes will cover general strategies on how to play the game, including discussion of some of the gameplay conventions borrowed from Metal Gear Solid 2: Sons of Liberty that have been grafted into The Twin Snakes. The guide also includes tips on weapons and equipment, a full walk-through of the campaign, and a chapter on some of the game's secrets and unlockable bonuses.
Table of Contents
BasicsEquipment
Weapons
Walk-Through
Heliport
Tank Hangar
Holding Cells
Armory
Armory South
Armory - again
Tank Hangar - again
Canyon
Nuke Building 1F
Nuke Building B1/B2
Caves
Underground Passage
Holding Cells
Communication Tower A
Communication Tower B
Blast Furnace
Cargo Elevator
Warehouse
Warehouse North
Underground Base
Basics
The tips and walk-through in this guide assume you are playing at the default settings: normal difficulty and type II radar. At higher difficulty settings, enemies have better detection ability, the radar is less useful, and the item drops may be different.
Remember, this is a stealth game, not a shoot 'em up. If you try to take on enemies with guns blazing, you're setting yourself up for failure because an unlimited number of enemies can spawn in after you're spotted. You want to stay out of sight as much as possible by observing the patrol pattern of the guards and cameras and moving only when you cannot be seen. If you must attack an enemy, try to do it quietly and catch them unawares.
Radar
The first thing you'll need to get accustomed to is the radar, which you can see in the top right hand corner of your screen. The white dot in the middle represents Solid Snake. You'll also see red dots with cones radiating out in front of them (these cones do not appear on the harder difficulty levels). The red dots represent enemies or cameras and the cones show their field of vision.
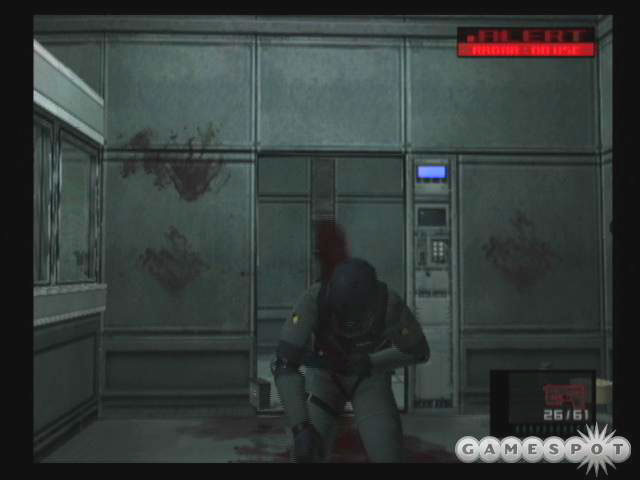
If you get caught in an enemy's field of vision, he'll become alarmed (represented by an exclamation mark over the guard's head), and the alert will sound off. When the alert-evasion mode is in effect, guards swarm into the room, and you lose the use of your radar. You'll need to hide for a period of time for the evasion mode to wear off and for the room to return to its normal state.
Tip: Usually the easiest way to get the guards off your tail is to just leave the room and go back to the previous area.

Though it may not make much logical sense, an enemy can be facing in your direction and still not detect you as long as you aren't close to his field of vision, which only extends out a few steps away. This means you can be standing at one end of a long hallway, with an enemy at the other end, and he won't "see" you until he gets much closer. Be aware that guards can become curious if you lurk just at the edge of their field of vision (denoted by a question mark above their heads and their cone of vision turning green). Inquisitive guards are more aggressive about seeking you out, and will break off their normal patrol patterns to look for you.
Codec

The codec is a radio device that you use to communicate with different characters in the game. If you're ever stuck and in need of a hint, you can use the codec to contact your friends. Most codec conversations just provide background information to flesh out the story, though. Here's a list of characters you can converse with over the codec:
- 140.85 - Colonel Campbell and Naomi Hunter: Campbell serves as your commanding officer for the mission and will provide useful information from time to time. Hunter is the medical officer and usually isn't as helpful as Campbell. Want to annoy her? Call her up on the codec while smoking.
- 140.96 - Mei Ling: Mei Ling is an engineering prodigy who helped create the radar and codec devices you rely on so heavily. Contact her when you want to save the game. She's also full of trite proverbs. Try ringing her up several times in a row without saving your game to see her pout and make faces at you.
- 141.80 - Master Miller: He was Snake's mentor and trainer, but considering how much useless advice he dispenses, it's a little hard to believe. The few times you come across animals in the game, Miller provides some interesting clues.
- 140.15 - Meryl Silverburgh: Meryl's a spunky, but inexperienced soldier who you will come across early on. She's also Campbell's niece, and plays a major role in the plot.
- 140.48 - Deep Throat: Practices the "don't call me, I'll call you," theory of communication. He'll ring you up with very useful tips from time to time, but you can never call him yourself, nor can you see his portrait.
- 141.52 - Nastasha Romanenko: Serves as the weapons expert for the mission. Contact her while holding the different weapons you come across, and she'll provide some interesting background information on each of them.
- 141.12 - Hal "Otacon" Emmerich: Otacon is the one of the lead engineers in charge of the Metal Gear project.
First Person View
You can press the Z button to go into first person mode. If you have a gun equipped, you can bring it up by holding down the A button, and releasing A to fire (this works for the M9 and SOCOM; the FAMAS will fire the moment you press A). First person mode is important because it allows you to carefully aim your shots and specific body parts. Shooting a regular soldier in the head will kill in one shot, or in the case of the M9, put him to sleep instantly. If you want to put down your weapon without firing a shot, press Y before releasing the A button.
Tip: You can use first person mode to look all the way across large rooms and observe guard patrol patterns. You don't need to move in close enough to see them on radar.
Basics - cont.
Movement
Solid Snake has a remarkable number of moves in his repertoire to help him evade detection. Learning all these moves might seem daunting at first, but with a little practice, you'll be using most of these agile maneuvers to keep Snake out of trouble
Walking vs. Running
The first thing you should get used to doing is switching between walking and running. Push a little bit on the left analog stick to walk, push all the way to run. While running may seem like it's making quite a racket, guards on normal difficulty are actually rather deaf. You can run up right behind them at full speed and they usually won't hear you. But once you get within a few steps, it's still advisable to slow to a walk.
The amount of noise you make depends on the surface you're walking on. Metal gratings, puddles of water, and other special surfaces are noticeably noisier when you move across them. If you run across one of these loud surfaces, nearby guards can definitely hear you. In multi-level rooms, running across loud surfaces can even trigger a curious response from a guard above or below you. Be wary of these surfaces, and when in doubt, slow to a walk.
Crouching, Crawling, and Hiding
Press the X button to toggle the crouch mode. Crouching can be useful for hiding behind half-height obstacles and furniture you find around the base. If you use the left analog stick to move while crouching, you can crawl under obstructions, laser tripwires, and even into ventilation ducts.
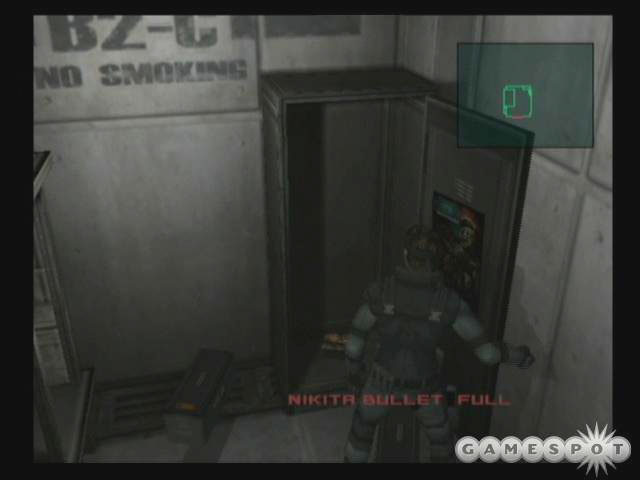
You can also use the environment to hide from enemies in special ways. Let's say you're standing on an elevated platform with a railing, and an enemy is approaching, and you have no place to run. You can vault over the railing and hang from it by pressing the action (Y) button. It's a good way to stay out of sight, although the time you can spend hanging is limited. You can also open up lockers using the Y button. Sometimes you'll find useful items, but you can also step into the locker and hide inside of it. The viewpoint changes to a first person view of the locker vent, but you'll know when an enemy is nearby by the sound of your heart beating.
Back to the Wall
Snake can reduce his profile by pushing his back up against the wall -- this changes to a low-angle camera view. From there you can push left or right to sidle along the wall. Press B to tap your fist against the wall, which can alert guards to move toward you, in case you need them to clear away from an area. If you reach a corner, you can press the L or R button to peer around the corner and get a better view around it, and use the C-stick to check wider angles. With a gun equipped, you can press A to instantly jump out from behind a corner and aim directly at an oncoming enemy.
Eliminating Guards
Though your primary goal is evasion, there will be many occasions where it's simply more expedient to quietly eliminate the patrolling guards. One way to do this is to engage the guard in hand-to-hand combat. Walk up and tab the B button a few times to punch and kick the guard. Move into the enemy and press A for a body slam. Do this a couple of times and the guard will be knocked unconscious for a short period of time. However, fighting is noisy and risky -- if the guard slips by you, he could call for backup or open fire, neither of which are acceptable outcomes.
Tip: Take note of the three stars that circle an enemy's head when he's knocked out. Every few seconds, one of the stars will disappear. When there are no more stars left, the guard will get up.
Chokeholds and Neck Snaps
A better way is to sneak up behind the guard and get him into a chokehold by pressing and holding the A button. But be sure you are at a slow walk, or standing still when you do it; if you're running while you make the grab you'll just end up body-slamming the enemy. Once you have an enemy in a chokehold, you have a number of choices. You can drag the live prisoner away and use him as a human shield, but that increases the chances he'll break out of your grasp. You can also press the A button once or twice and let go -- this will drop the guard into an knocked-out state just as if you beat him up. The easiest thing to do is to just press the A button repeatedly and snap the guy's neck. This manner of killing is quiet and ensures the guard won't get up again.
Using Weapons
You can kill or disable soldiers using any number of weapons, including grenades, mines, and guns. However most of these methods are noisy, and you risk drawing the attention of other enemies in the area. Two quiet ways to kill soldiers are by using the SOCOM with the silencer, or the M9 tranquilizer gun. Go into first person mode and aim for the head in order to take them down in one shot.
Dragging and Shaking Down Bodies
Once you have a guard on the ground, dead or unconscious, you can pick up and drag their bodies around by pressing the A button (unequip your weapon first). You want to make sure that you remove any bodies from patrol routes, because if a soldier finds one of his buddies dead, or knocked out, it's a sure way to bring an alarm down on you. If you leave a sleeping soldier to be found, the patrolling guard will wake up his comrade, and you're back at square one. So be sure to drag bodies off into a dark corner, and save yourself some headaches.
Tip: Even if a dead body is already lying in an ideal hiding spot, it's still worth it to pick up and drop the body once or twice. Doing so will sometimes "shake out" useful items like ammunition and rations.
Equipment
Body Armor
Location: Behind a level 6 security door in the gassed lab area of Nuke Building B2 (bottom office on the left)
Description: When you have this equipped, it reduces the amount of damage you take from attacks.
Camera
Location: Armory South, behind a level 6 door.
Description: You can take and save shots onto your memory card with this. If you shoot the right spot, you can find special "ghost" easter eggs.
Cardboard Boxes
Location: Box 1 - Bottom right room of the Armory. Box 2 - Top left office in Nuke Building B1. Box 3 - Southwest room after second Sniper Wolf battle.
Description: In a comic twist, you can use cardboard boxes to sneak around and hide. If you do it right, you can plop down right next to a guard without arousing much suspicion. Boxes are also useful for hiding out while you wait for an alarm to subside.
Cigarettes
Location: You start with the cigarettes
Description: They deplete your life constantly while they're equipped, but if you don't have the thermal goggles, smoking cigarettes is the only way to see infrared trip wires.
Gas Mask
Location: Nuke Building, level B2
Description: Equipping a gas mask reduces the rate at which your oxygen bar depletes while you're in a gas-filled area.
Handkerchief
Location: Otacon gives this to you in the Holding Cells
Description: Because it has the scent of Sniper Wolf on it, wearing this keeps you from getting attacked by wolves.
Ketchup
Location: Otacon gives it to you in the Holding Cells
Description: A salty, tomato-based condiment. Use it to fake your death and dupe the guard in the holding cells into opening the door.
Keycards (1-7)
Location: Lv1 - Meeting the DARPA Chief in the holding cells ; Lv2 - Defeating Revolver Ocelot in the Armory South; Lv3 - Beating the Tank boss in the canyon; Lv4 - Meeting Otacon; Lv5 - Meryl gives this to you in the restroom; Lv6 - Otacon gives it to you in the holding cells; Lv7 - after you kill Vulcan Raven
Description: You need keycards in your inventory to open the appropriate security doors.
Mine Detector
Location: Second floor of the tank hangar, northeastern room right next to the security camera
Description: Shows the location of claymore mines in the area, and their lethal triggering radius.
Night Vision Goggles
Location: Gassed lab area of Nuke Building B1. Top office on the left
Description: Improves visibility in dark areas, but you really never need this device.
PAL Card
Location: Meryl gives it to you in the restroom
Description: You'll need this to complete a puzzle near the end of the game.
Pentazem
Location: You find it first in the caves where the wolves are.
Description: This drug steadies your nerves, eliminating scope drift, so you can aim more accurately with the sniper rifle.
Rations
Location: All over the place
Description: Restores part of your life bar. These will automatically be administered when your life bar depletes to zero, as long as you have them equipped. Or you can use them manually if you prefer.
Rope
Location: Bottom floor of Communication Tower A
Description: Lets you rappel from the tower roof at a key moment.
Silencer
Location: First floor of the tank hangar, northeastern room, just to the east of the cargo bay door
Description: You can affix this device to your SOCOM to allow you to kill quietly and from a distance.
Thermal Goggles
Location: Second floor of the tank hangar, eastern room
Description: Equipping these allows you to see trap doors and infrared tripwires. It can also come in handy for detecting boss characters using camouflage.
Weapons
Guns
M9 tranquilizer gun
Location: Leftmost locker in the northwest corner of the Docks
Description: Pistol that fires tranquilizer darts. Guards hit in the head will fall asleep immediately, while those hit in another part of the body will take a second or two to fall unconscious. Has a nine-round magazine capacity, and must be cocked after every shot, making its refire rate rather slow.
SOCOM
Location: Inside the truck in the Heliport area.
Description: The Heckler & Koch Mark 23 handgun was developed specially for the United States Special Operations Command (SOCOM) in the early 1990s, so that's how the SOCOM nickname came about. The SOCOM pistol is chambered for .45ACP ammunition and features a 12 round magazine capacity, a threaded barrel to accept a silencer (which you can find in the tank hangar behind a level 2 security door), and slide rails underneath the muzzle for mounting a tactical light or a laser aiming device.
FAMAS
Location: The Armory, in the southeastern room behind a level 2 security door.
Description: Manufactured for the French military by the Belgian arms company Fabrique Nationale, the FAMAS is a most unusual looking assault rifle. The oversized carrying handle/handguard along the top gives the weapon a distinctive and unmistakable look. Its bullpup design allows it to have the accuracy of a full sized rifle, along with the compactness of a large submachine gun. The weapon is chambered for NATO standard 5.56 x 45 mm rounds and sports a 25 shot magazine. Fire enough shots at the combat shield-toting soldiers in the game, and the FAMAS will shatter their armor. However, the name of the game is evasion, so this noisy toy won't get a whole lot of use.
PSG1
Location: The Armory inside the room on the top left.
Description: The PSG1 is one of the premier sniper rifles of the modern era. Like the SOCOM, it is manufactured by the German manufacturer Heckler & Koch, and is employed by counter-terrorist forces and police units throughout the world. The rifle is semi-automatic, and has a five-round magazine capacity for 7.62 x 51 mm cartridges.
PSG1-T
Location: Nuke Building B1, inside the bottom left office
Description: This is the tranquilizer dart version of the PSG1 rifle.
Grenades
Stun Grenade
Description: These are your standard flashbang grenades, and will stun anyone in the immediate vicinity. Non-lethal.
Chaff Grenade
Description: These emit a cloud of thin metal strips that can jam cameras and weapon tracking systems. Unfortunately it will also render your radar inoperable until the cloud dissipates. You don't have to aim your toss. Setting one off will affect the entire room or area.
Grenade
Description: Standard anti-personnel fragmentation grenade. Hold down the button to toss it further. They make too much noise to be useful for taking out guards, but you may find them useful in certain situations.
Explosives
C4
Location: C4 respawns periodically in the top middle room of the Armory.
Description: Remote-controlled, plastic explosive. Place down one or more blocks of C4 with the A button and set them off with the B button. C4 can be used to blow open hollow walls or take out cameras. Skilled players can attach C4 to the backs of unsuspecting enemies and have some fun.
Claymore Mines
Location: You'll first come across them planted in the Canyon. Gather them up by equipping the mind detector and crawling at the mines from behind.
Description: Unlike standard landmines, claymores are not set off when they're stepped on. They spray out hundreds of ball bearings directionally into an arc. Position them correctly and they'll go off when any soldier moves into its effective radius.
Missiles
Nikita
Location: Nuke Building, Level B2 in the northeast corner of the offices.
Description: Remote-controlled missile. Firing a Nikita switches you into a first-person, nose camera view of the missile. The ability to steer them means you can attack a target indirectly from a safe position. They're vulnerable to gun cameras and have a limited amount of fuel to work with.
Stinger
Location: Communication Tower Corridor
Description: Hand-held, heat-seeking, anti-aircraft missile. It's the standard infantry anti-air weapon in the US military, but many were sold and shipped to Afghan mujaheddin after the Soviets invaded that country. In Metal Gear Solid, stingers can also be fired straight as dumb rockets, without a lock on. You'll be relying a lot on this weapon near and at the end of the game.
Walk-through
This walk-through assumes you are playing at the default settings: normal difficulty and type II radar. At higher difficulty settings, enemies have better detection ability, the radar is less useful, and the item drops may be different.
The Docks
Key Item: M9 Tranquilizer Gun
After a lengthy opening cutscene you'll emerge from the water in the southwestern corner of an underground dock. Crawl under the pipe and move to the right, along the bottom railing, all the way to the southern end of the easternmost aisle. You'll see two soldiers on patrol, one to the west, and one patrolling the center and east aisles.
As the right-most guard approaches the dock railing, loop around the center area, sneak up on him from behind, and snap his neck. Drag him into the shadows of the nearby container and he'll usually drop a ration. Hide behind that corner and wait for the other guard to patrol past the middle of the room.

The remaining guard will walk to the western aisle from the center as part of his patrol. Catch up with him there, snap his neck and try shaking his body down for an item. One more soldier will be coming down the elevator shortly, but you should have enough time to run to the lockers in the northwest corner of the room. Open the left locker and grab the M9 Tranquilizer gun. You can hide in that locker and ambush the guard or run back to the center of the room and hide behind one of the containers there. Once the soldier pops out of the elevator and moves toward the west, make your move and eliminate him however you see fit.
The elevator is ready for you to use, but if you like, you can hop back into the water where you started, you can grab a can of rations down and to your left underneath the surface of the water. There's another can of rations sitting in the southeastern corner behind a pipe. Go into the elevator when you're ready to start another cutscene.
Heliport
Key Item: SOCOM Pistol
From your starting position next to the elevator, run east, then north alongside the big containers in the snow. Hide behind one of the top two boxes and wait for the guard to walk by. Loop around and subdue him. Run west from that area and jump in the back of the truck. Walk behind the box to pick up the SOCOM pistol. Usually the other guard who patrols the lower level is asleep right underneath the surveillance camera in the northwest corner of the map. However, sometimes he is awake and patrolling around the truck, so be wary.

If he's asleep, hop out of the truck, walk around the right side of it and go toward the sleeping guard. He's standing in front of the vent! Pop him in the head with the M9 and drag his body out of the way. Once that's done, you can crawl into the ventilation shaft to get to the next area. If you feel like picking up other items, go back to the helipad. Directly on the helipad is a box of chaff grenades. Stand at the northern stairs to the pad, wait for the spotlights to separate, and you can dash onto the pad to get them. Directly west of the helipad is a room guarded by a camera. The left locker on the left side of the room has a box of stun grenades, but these may not be worth the trouble.
Alternatively, there's a vent on the second floor of the area where a third guard is patrolling. If you're good, you can nail him with the M9 from ground level, or you can just run up the stairs in the northeast (beware of the camera next to the staircase) and ambush him there. You'll find the vent a little ways past the first spotlight.
Tank Hangar
Key Item: Thermal Goggles
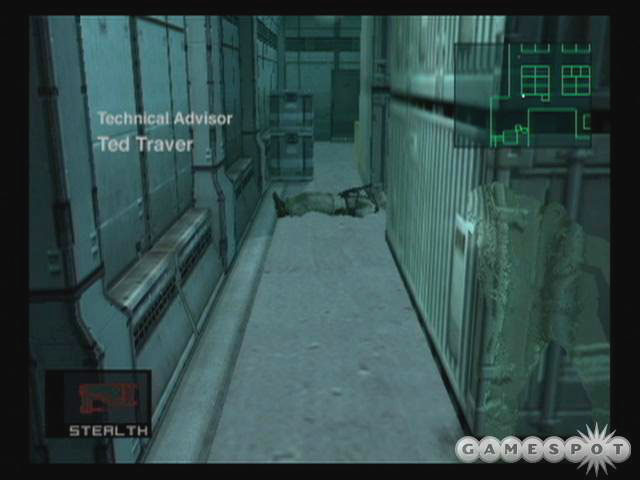
Assuming you went in the ground-level shaft, crawl straight ahead and then to the right. You'll see a bunch of rats scurry away. Just keep following them, crawling down into a bit of water and back up again. Hang a left at the end, crawl past a closed vent on your left and all the way to the end, then turn left at the open vent. Do not exit the vent shaft yet! Wait there for a soldier to walk by. He'll stop in front of the vent, face it for a moment, then walk off toward the left. The instant he turns away from the vent, crawl out, stand up and ambush him in the southeastern corner of the room. Don't run -- this area of the room is filled with metal flooring that could give you away. A brisk walk will do. Take him out there, then grab the M9 ammo in the southeastern corner.

One more soldier patrols around the left tank. Sneak up behind him and take him out with your M9 or your bare hands. Grab the SOCOM ammo behind the staircase on the left, then go upstairs, but be careful of the camera up there. Make your move as the camera pans up and get to the second floor. Run around the catwalk along the bottom to the eastern side of the hangar, and find an open room with a camera inside. Run directly underneath the camera when it's not facing you, and snag the thermal goggles. You can go north after exiting the room and grab some chaff grenades at the very end of the catwalk if you like. Again, be careful of the camera at the corner. If you crawled into the upper ventilation shaft from outside, you'd have dropped down in this area.
Make your way back downstairs, avoiding the camera, and call the elevator at the north end of the room (it faces the rear end of the left tank). Step inside, walk to the control panel and select B1 to head to the holding cells.
Holding Cells
Key item: LV1 key card
Exit the elevator and walk south, then east to the end of the hall. You'll see a vent at your feet directly in front of you. Crawl in it a little ways for rations, then crawl back out. Use the ladder to climb up into an overhead vent.
Crawling through the vents is a pretty straightforward exercise. You can veer left along the way to see a funny cutscene with a soldier in the restroom. Keep going past that vent to grab some M9 ammo. Once you're done with that detour, keep crawling on your original path for two more cutscenes before you drop down into the DARPA chief's cell. He'll hand over the LV1 key card. After all those cutscenes are over, crawl under the DARPA chief's bed, and grab the rations. The door to the cell will open. Walk outside for, yes, more cutscenes.
Enemies are streaming into the room. Equip your rations, just in case, and then whip out your SOCOM. Start blasting the waves of soldiers coming in - going into first person mode and going for headshots is the easiest way to do it, but once you take care of the first wave, Meryl does a pretty good job at mopping up the rest. The final wave of soldiers will toss a grenade into your room. Switch out of first person and run away from the grenade to avoid its blast. Finish off the rest of the soldiers for more movies.
Once you regain control of Snake, you can gather up some goodies before leaving for the next area. There is SOCOM ammo on the floor in the room where you and Meryl were fighting the soldiers. Run into the office and open up the locker for more SOCOM ammo. Head into the bathroom to pick up the book and some M9 ammo. Go back to the elevator and head down to level B2.
Armory
Key Items: C4, grenades
There are no soldiers in this room for now, but that doesn't mean there's no danger. There are three trap doors in this room - they're in the left, left-middle, and right-middle aisles that run up and down the room. If you equip your thermal goggles, you can easily see them as red squares. Avoid walking over those parts. If you didn't grab the thermal goggles you can just make a point of running right next to walls to avoid the traps, or only use the right-most aisle when traversing up and down the room.
There are six small rooms in the armory. Currently you can only enter three of the rooms. The top middle room contains six blocks of C4 (two are in the lockers). If you move in and out of the Armory, the C4 should respawn, assuming you have no C4 in your inventory. The bottom middle room has four batches of SOCOM ammo (one is in the locker). Finally, the bottom left room has four boxes of grenades. Be sure to grab those, because they'll come in handy shortly.

If you remember the hints you got from Campbell and Hunter, there should be some false walls in the armory that you can destroy. There are a number of ways you can find these. Going into first person view mode, you can see patches on the walls where the paint looks incomplete. Or you can tap along the walls with your fist and find areas that sound different from others. You'll find two of these false walls on either side of the elevator. Use the C4 to blow open these rooms and you'll find some goodies. The left secret room has SOCOM ammo, FAMAS ammo, M9 ammo, and stun grenades. The right secret room has chaff grenades, SOCOM ammo, and three boxes of FAMAS ammo.
There's one more secret room to find, and it's in the southwestern corner of the armory. Blow open that wall and head into the armory south.
Armory South
Key Item: Lv2 key card
Walk all the way down and blow open the wall toward the right. Walk into the hole, and you'll see two discolored parts of the wall at the right end of the hallway. Blow them both open if you wish, but don't bother using the hole that heads east. There are gun cameras in there, and a Lv4 door and a Lv6 door you can't open yet. If you must take a peek, toss a chaff grenade first to confuse the gun cameras. Once you're done lollygagging, go into the door that heads north for a cutscene and your first boss fight.
Boss Fight - Revolver Ocelot
The room is wired from top to bottom with explosives. Don't attempt to run through the middle of the room or it will blow sky high; stick to the perimeter. Also be careful that none of your shots hit Baker. Equip your rations and your SOCOM. If you don't mind playing it a little sloppy, Ocelot is a pushover. Just stop in a relatively open spot where Baker won't be in your crossfire. Get into first person mode and just trade shots with Ocelot. He can only take four shots to the head before going down.
If you choose not to do things the easy way, you'll be running around in circles a lot with Ocelot, firing blindly. If you attempt to hide behind a pillar, he'll bank his shots off the wall like Minnesota Fats and nail you. Just keep moving and try to catch him stationary when he's reloading. The indicator in the top middle will tell you how many shots he's got left.
After the fight, Baker gives you his Lv2 key card. You can also gather up a couple boxes of SOCOM ammo and a box of M9 ammo in this room. Before leaving, you should call up Meryl on the codec using the frequency 140.15. After that long conversation is over, head back into the Armory.
Armory - again
Key Item: FAMAS, Cardboard Box 1
There are two soldiers patrolling this room - one to the west and one to the east. By now you should be very experienced in how to handle these goons, so either evade them or eliminate them as you see fit. Your LV2 key card will allow you to enter the bottom right room. Be careful though! There are infrared trip wires in there, running left to right across the middle of the room. Equip your thermal goggles or cigarettes if you want to see them, and just crawl underneath before grabbing the cardboard box, FAMAS, and FAMAS ammo on the far side of the room. Nab the two boxes of FAMAS ammo next to the door before leaving. Revisit the two secret rooms next to the elevator to pick up the four boxes of FAMAS ammo you couldn't pick up earlier. Don't forget about the trap doors in the secret room on the right. Once you're done pillaging the armory, head back to the Tank Hangar on floor 1.
Tank Hangar - again
Key Items: Mine Detector, Silencer
Assuming you rang up Meryl earlier, she'll open the cargo bay door for you as you enter the tank hangar. From the elevator, quietly move to the right and enter the room in the northeastern corner of the first floor, just to the right of the cargo bay door. There's a guard half asleep in this room, but if you try to sneak up on him for a chokehold, he always seems to wake up before you get there. Make it easy on yourself. Just drill him in the head with the M9 as soon as you open the door to the room. Grab the chaff grenades on top of the box, and the silencer in the bottom right corner of the room. To attach the silencer to your SOCOM, equip the silencer, and then equip your SOCOM. Now you can kill silently from afar!
There is one guard patrolling in a loop around the left tank (where'd the other tank go?). Every time he reaches the top of the room near the elevator, he reports into his radio. You may be tempted to try out your new silenced SOCOM on him, but don't do it. If he misses a report, his commander becomes suspicious and additional guards will enter the hangar to investigate. It's easiest to just evade him. Stand behind the box near the tank until the soldier moves away from the base of the left staircase. As soon as he moves, get up the stairs, again being mindful of the camera at the top. Enter the room next to the top of the stairs for chaff grenades.
Exit and make your way around the catwalk, but be careful about running on the metal gratings. If you make too much noise up there, the guard you left at the bottom may hear you and become suspicious. If he runs up to check things out, vault over the side of the railing (using the Y button) and hang there until he goes away. Then climb back over.

Another guard patrols the top catwalk on the eastern side. It's difficult to time your approach to ambush him. Remember that you have an M9 and a silenced SOCOM. Get into first person mode, make sure he's out of range of the camera in the northeast, and shoot him from across the room. Walk into the room in the northeast corner, being mindful of the nearby camera. Grab the mine detector in this room, and the stun grenades in the center locker on the right side. Exit the room and you can grab one more box of chaff grenades at the very end of the catwalk.
Carefully make your way back downstairs, avoiding the cameras and the remaining guard. Enter the cargo bay area that Meryl opened for you. As you walk in, Meryl will warn you about infrared trip wires in the wall. There are five sets of trip wires running left to right and they move up and down. Break out your thermal goggles and walk across each part as the beams go above your head. You'll know the safe areas to wait in between by the seams along the floor. Make your way to the end and you'll enter the canyon.
Canyon
Key Item: Lv3 key card
Deep Throat will warn you about the claymore mines in this area, so get out your mine detector. You'll see their position in your radar along with their lethal areas colored in yellow. Crawl up behind them to collect them for later use. There are four in the center, two in the right hand alley between the rocks and one in the left side. You won't be able to collect the one on the right without triggering the boss fight though. If you don't have the mine detector, you can spot the position of the claymores as red dots but you won't be able to see their blast radius. Just avoid the very center of the area and make your way to the top to trigger the boss fight.
Boss Fight - Tank
As always, equip the rations in your item slot. The tank can hurt you in three ways - getting hit by the main cannon, the gunner shooting you with the machine gun, or by running you over. You can avoid the main cannon by periodically tossing out chaff grenades. That confuses the tank's targeting system. Grenade and gun ammo is sprinkled liberally around the area. Pick some up if you start running dry on anything.
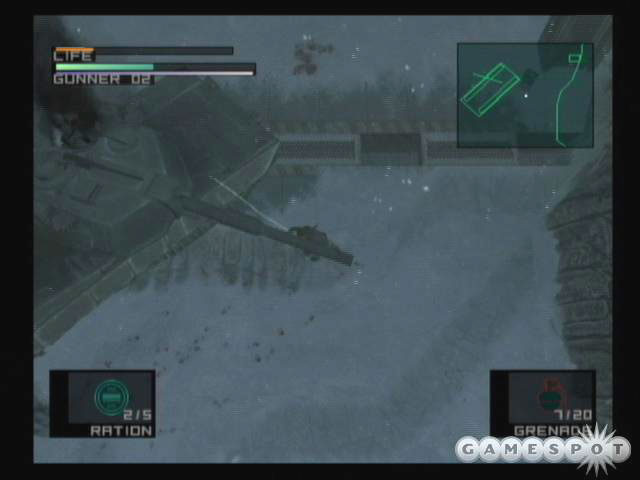
You can attack in one of two ways - the standard tactic is to lob grenades into the gunner's seat. It takes about three direct hits to take out each of the two gunners. An alternative way to do this mission is to whip out your FAMAS or SOCOM and attempt to shoot the gunners directly. The latter option seems to be a little more difficult, but it's definitely doable, especially if you make use of the metal pillar on the west side as cover. You can pop out from there to fire. Try to go for head shots on the gunner, as body shots don't seem to take off that much damage. Once you've killed both gunners, you'll see a cutscene and receive the Lv3 key card as your reward. If you're low on rations, you'll find one in the southwestern portion of the canyon. Various boxes of grenade and gun ammo are lying around as well. Move north when you're done scavenging and enter the nuke building.
Nuke Building 1F

Run up the left side catwalk and grab a ration all the way at the end, underneath a window. Run back to where you started, then down the ramp toward a nearly closed door. You should be arriving just as a soldier walks by behind the door. Crawl underneath. You can't use your weapons in here unfortunately. Walk (don't run) to the left, along the corridor between the south wall and a row of nuke missiles. You'll come upon a pair of lockers in the southwest corner of the room. Quickly hop into one of them. The left side has some M9 ammo, and the right locker has a box of grenades. Keep watching from inside the locker until the soldier passes by. You'll know he's coming when the sound of your heart beating gets louder.
As he passes by, get out of the locker, and head up the stairs. Kneel down on the stairwell, just before you get to the top -- the soldier up soldier up there will stop in front of the elevator and look around a bit. If you're kneeling at the top of the stairs he won't see you when he turns around. As he moves off to continue his patrol, stand up and ambush him from behind. Get into the elevator and head to level B1.
Nuke Building B1
Key Item: Nikita launcher
Get out of the elevator and head to the left and enter the second door on the right. This is the men's room, and sure enough, a soldier is relieving himself at the far urinal. Subdue him quickly, then grab the ration in the back corner and the book in the bottom toilet stall. If you take too much time in here another soldier from the offices to the south will arrive at the bathroom, so mind your time and your radar. Assuming you worked quickly, walk into the offices to the south of the main hallway, and take out the soldier patrolling there. In the top right corner, you'll find the Nikita launcher, a lot of Nikita ammo and some stun grenades. Raid the lockers on the eastern wall for a ration and M9 ammo. You'll also find SOCOM ammo and FAMAS ammo in the center of the room. When you're finished looking, go to the elevator and head down to level B2.
Nuke Building B2
Key Item: Gas Mask
Gas and an electrified floor guard this area. From the cutscene, you learn the location of the electric generator that powers the floor--it's past the laboratory to the west. You'll need to use your Nikita missiles to take out that generator, but there are several gun cameras along the long, twisty path. The easiest thing to do is to use your Nikita to take out a few of those cameras, so they don't shoot down your missile on the way to the generator.

Simply step into the gas filled room, fire one down the long hallway, and then hang a right into the laboratory. If you're going for the gun cameras, just ram the missile into the wall beneath each camera. One is in the back corner to the left just as you enter the lab area. One is to the right of the first camera, just underneath some high cabinets. A third gun is just underneath the door of the third office on the right, inside the lab. You can't take out the last gun camera with the Nikita. Now just steer all the way back through the lab, into the open door at the end of the room, and hang a right, then a left. A short cutscene plays when you've successfully taken out the generator.
Take another breath of air, then run down the middle hallway to the last office on the right. This office is guarded by a camera, so take it out with a Nikita, or just crawl on the floor so it won't see you. Grab the book and gas mask here. Run back out and take another breath of fresh air, and equip the gas mask, which will greatly reduce the rate of oxygen loss in the gassed areas.
You can explore the offices to the left where you took out all the gun cameras, but there isn't a whole lot of interesting stuff. The second office from the bottom has boxes of grenades, there's Nikita ammo in the second office from the top, and chaff grenades in the generator room. You can use chaff grenades to confuse the remaining camera.
When you're all done looting, go back to the intersection of the two hallways, and go to the right. You'll find another door guarded by a camera. Take out the camera or slip past it, then go into the next room. Open the other door in that room to trigger a gory cutscene. Walk through the bloody hallway and into the next room to start a boss fight.
Otacon's Lab
Key Item: Lv 4 key card
Boss Fight: Cyber Ninja
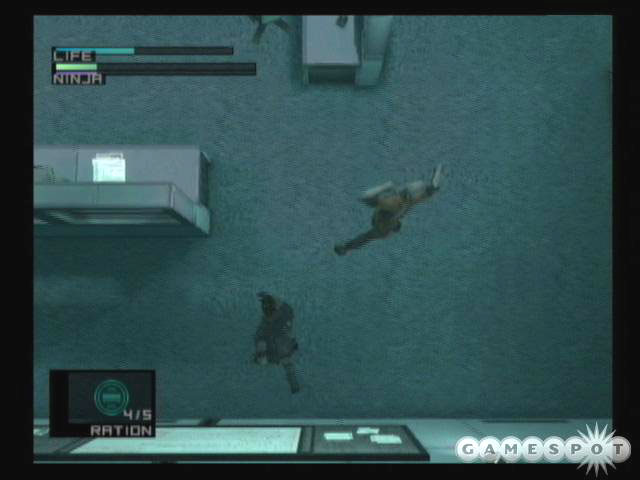
Don't bother trying to use weapons against the Cyber Ninja. He'll deflect all the bullets. Go hand to hand and land a couple of combos on him to make him put away his sword. The cyber ninja will begin warping around the room with a series of kicks. Stay out of the path of the kicks, and strike right after he lands. He'll also attack with a stomp maneuver; again stay out of the way, and punch him after he lands. Take off about half of his health, and the ninja will engage his optical camouflage. You can switch to your thermal goggles to make it easier to see him, but the distortion should make it obvious enough that it isn't necessary. Hit him a few times, and he'll stop using the camouflage. He'll go back to his flip attacks, and mix in a teleport move where he warps behind you and winds up with a slow punch. It should be easy to dodge these--after he whiffs on the punch, nail him with more punches and kicks until you've defeated him.
After a ton of cutscenes and codec dialogs, you'll regain control of Snake. Otacon has gives you the Lv 4 key card. You can also make your way around the room picking various goodies, like FAMAS ammo, chaff grenades, SOCOM ammo, and a ration. Be sure to take a peek at the GameCube setup on the center desk, and the Mario & Yoshi dolls in the top right corner. When you're done, head back to the gassed lab areas that has/had all the cameras
Nuke Building B2
Key Item: Night vision goggles
In the lab area on the left, you can now enter the office at the top, using your new Lv 4 key card. Go in and grab the night vision goggles. Head toward the elevator. On your way out via the center hallway, you can duck into the second office from the bottom and grab a couple boxes of stun grenades. Head to level B1.
Nuke Building B1
Key Item: Lv 5 key card

Run straight down into the center office area to look for Meryl. She's wearing the green fatigues and should be strolling down the west aisle of the office. Walk down that side and let her spot you, and she'll run out of the room and into the ladies' restroom on the east end of the hallway. Follow her there for more cutscenes. She'll hand over the Lv5 key card, which will enable you to enter the door in the north of this area. Go through all of the doors to trigger another boss fight.
Commander Room
Boss Fight: Psycho Mantis
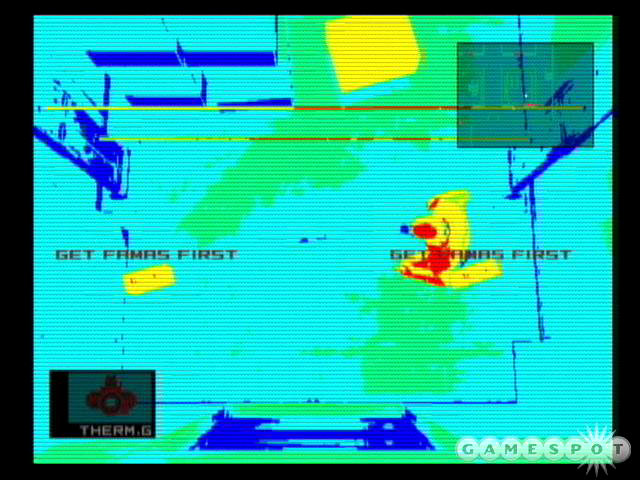
Meryl is being mind controlled by Psycho Mantis. She fires at you with her gun. Punch or throw her to knock her out, or toss a stun grenade at her. The fight with Psycho Mantis begins with him warping around the room while invisible and throwing explosive balls of energy at you. You can activate the thermal goggles when he does this to see where he's going and then attack him. The problem is that he dodges your shots and your punches because he can read your "mind" or your controller inputs. In order to get around this, plug your controller into another port. He won't be able to read your actions, so you should be able to shoot him! Whip out your FAMAS.

After throwing a few balls of energy, Mantis will float to the middle of the room, where he's visible, and start using furniture and other objects in the room to attack you. Crawl on the ground while the furniture flies. When it goes away, you'll have a brief opportunity to stand up and shoot Mantis. Keep repeating the process. Go prone and avoid the furniture. When it goes away, stand up and shoot Mantis. When you have him half-dead, he'll take control of Meryl again and have her shoot you. Throw a stun grenade at her. Mantis will then attempt to force Meryl to commit suicide. Immediately throw another stun grenade at her.
From here on out, Mantis continues his pattern, alternating between using the energy ball attacks and the flying furniture. Keep blasting him with the FAMAS when you have an opening, and he'll go down. After Mantis opens the passageway, grab the rations on the way out and head to the caves.
Caves
Head to the right, and at the intersection, go south for some SOCOM ammo, and north for some rations. If you go into first person mode where the rations are, you can see where Meryl is waiting for you. Go back to where you entered the area, and go north through the snow. Crawl under the gap here, and you may see some wolves. The best weapon against the wolves is actually the M9. If you just kill the wolves, more will spawn in, but putting them to sleep keeps you from being harassed constantly. Walk north through the clearing, then hang a left to grab some FAMAS ammo. Now go back to the right, and then south. You'll see some PSG1 and PSG1-T ammo that you can't pick up yet. When you reach a dead end, crawl under the gap to the south, and grab the pentazem. Now go back out, and under the gap to the right, and meet up with Meryl. Grab the rations next to the door before leaving.
Underground Passage
Meryl will walk a pattern in the room to avoid the mines there. Monkey see, monkey do. Follow her footsteps, meet her again and you'll trigger another cutscene. After Meryl gets lit up by Sniper Wolf, you'll have to leave the area to find a sniper rifle. You can get one in the armory. Backtrack there and get it. You'll find a few changes in some areas, though. When you pass through the canyon, it's guarded by cameras and troops, and the laser trip wires in the cargo bay have been disabled. When you get to the armory, you'll find it's patrolled by a few troops as well. You should have the skills and know-how to bypass these dangers already. Make use of your toys, like cardboard boxes and silenced weapons.
Go into the room on the top left of the armory that has a level 5 security door. Activate your thermal goggles and crawl underneath the laser trip wires. Grab the PSG1. Make your way back to the area where Sniper Wolf shot Meryl, picking up PSG1 ammo along the way for the boss fight. Grab the pentazem next to the doorway.
Boss Fight: Sniper Wolf

Make your way down the long walkway. Along the path you'll find PSG1 ammo, and a ration near the end of the path on the right, guarded by a gun camera. At the base of the catwalk area, you'll find another ration, PSG1 ammo, and FAMAS ammo at the lower level. Up the stairs, you'll find M9 ammo and SOCOM ammo. Save your game here, because the choice you make next will affect the ending of the game. You may want to come back to this point and replay the game to see the other ending. Approach the doorway to start a cutscene.
Holding Cells
Key Items: Ketchup, Lv 6 key card, handkerchief

After much yapping in the cutscenes, you find yourself strapped to a torture device, controlled by Revolver Ocelot. He shocks you, which will drain your health. Simply mash the A button to counteract the torture and bring your health up. You can choose to submit to the torture, by pressing start + A. Or you can choose to withstand it as best you can.
Spoiler Warning: Skip to the next paragraph if you don't want the ending spoiled for you. If you persevere through the torture, Meryl lives at the end, and you earn the bandanna item when you replay the game. If you submit to the torture, Meryl dies, and you end the game with Otacon as your partner through the last chase scene. He gives you the stealth camouflage suit.
After the torture scene, you end up in a prison cell. The guard watching over you seems to have some digestive issues. Give Otacon a call. When the guard runs off to the bathroom, Otacon sneaks in and gives you ketchup, rations, a Lv 6 key card, and a handkerchief. Before the soldier returns, lie down on the ground, and use the ketchup. The guard will open the door to investigate. Stand up and beat him up after the door opens. Run back toward the torture room. There are rations on the other side of the prison cell if you need them. Grab the large box next to the torture machine, which will give you all your items and weapons back. Leave the room via the top right door.
You're back in a familiar spot, but it's guarded by cameras now. Carefully make your way to the elevator, and get back to the tank hangar. Your goal is to backtrack all the way back to the door where you got captured in the first place. Optionally, you can go first to the Armory South area, east of your fight with Revolver Ocelot, to pick up the camera.
Nuke Building B2
Key Item: Body Armor
When you get to the nuke building, stop off on floor B2 to get the body armor. Go back to the lab area where all the gun cameras are/were and enter the office at the bottom, which has a level 6 door that you can open now. Grab the body armor inside, then go back to the elevator, and head to level B1.
Nuke Building B1
Key Items: Medicine, PSG1-T

We've done this drill before. Head to the men's bathroom as you did the first time here, and take out the soldier there. Go to the offices in the south and take out the soldier patrolling in there. This time, you can raid all the locked office rooms for useful items. The office at the top left has another cardboard box and rations. The middle office on the left has the medicine, which is key because you caught a cold while you were locked up with no shirt on. Use the medicine to stop your sneezing, which could give you away as you're sneaking around. Bottom left office has pentazem, the PSG1-T tranquilizer rifle, and PSG1-T ammo. The rest of the area has ammo for just about every other weapon in your arsenal, so top off your ammo if you need to before you continue to the area where you were captured. As you make your way back there, equip the handkerchief in the caves, so the wolves won't attack you.
Communication Tower A
Key Item: Rope
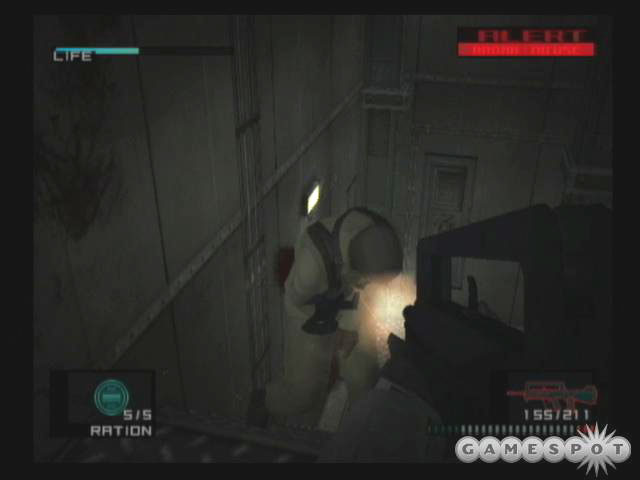
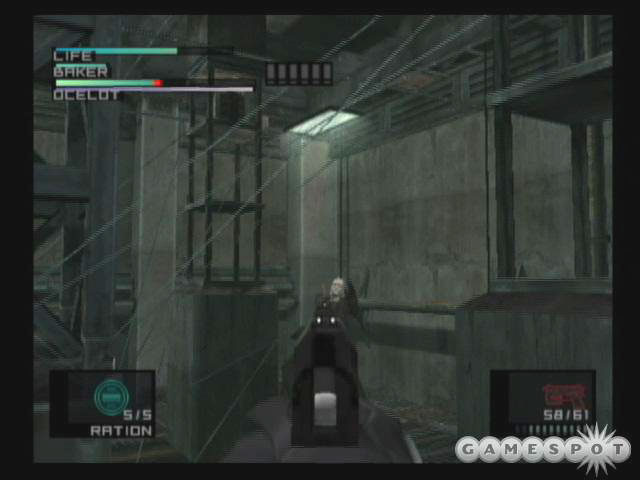
Welcome to disc two. Go down the hallway, grabbing SOCOM ammo and FAMAS ammo along the way. Entering the next door will trigger an alarm. Finally some real action! Grab the stun grenades and especially the rope here. Begin running up the never ending stairs, shooting soldiers with your FAMAS as you go along. Alternatively, you can throw lots of stun grenades if you're trying to kill as few people as possible. Eventually you'll find a door, but Otacon tells you it's frozen shut. Keep moving up the tower, shooting soldiers as needed. The idea is to keep moving, because a never-ending stream of soldiers will whittle down your health if you stop too long to fight. Eventually you'll reach the top level, where you can grab rations, and FAMAS ammo before you come across a ladder that you can use to take you to the roof.
Communication Tower Roof

Walk out to start another cutscene. Liquid Snake will jump you with a Hind gunship. When you regain control of Solid Snake, equip the rope, and you'll begin a brief rappelling sequence. Follow the directions from Colonel Campbell, and make your way down the side of the building. Liquid will strafe you a couple of times, but just descend quickly and you won't take much damage, if any.
Communication Tower Corridor
Key Item: Stinger
You can grab the C4 nearby to blow open the door that was frozen shut, but there's really no point in doing so. You don't want to go back in that direction. Instead, use a scoped weapon, and take a look across the bridge. You'll see three soldiers there. Use your sniper rifle, or Nikita to eliminate those soldiers, then walk across. Liquid ambushes you at the other side. Quickly move to the left and run inside to escape. Grab the Stinger launcher and ammo, then go in the door to the south to enter Communication Tower B.
Communication Tower B
Walk down and around to the right, and press the elevator button. The elevator isn't working. The stairs up are blocked, so walk around the other way (a box of grenades and SOCOM ammo are lying near the door), and down the stairs until you trigger a short scene. The stairs down have been blown off. Go back to the elevator and you'll find Otacon there. After chatting with him, you'll find that the stairs up are now clear. Head up the stairs. There are four sets of gun cameras that you need to worry about though. These cameras are on floors 11, 15, 19, and 23. Use chaff grenades at the appropriate times to spoof the cameras. Floor 27 is the top floor--you'll find FAMAS ammo, chaff grenades, two boxes of Stinger missiles, and a ration. Use the ladder on the north side of floor 27 to get up to the roof. Walk out on to the roof to start the boss fight.
Boss Fight: Hind Helicopter

Liquid Snake circles the tower in his helicopter shooting you, and taunting you. Equip the Stinger and use the radar in the top right to help you aim. You need to center the helicopter in your sights for a second or two before it will lock on (indicated by a red box and diamond). You can actually track the helicopter through objects, and even obtain a lockon without direct visual contact, but don't fire until you have a clear shot. The fight is pretty straightforward. Sometimes Liquid will attempt to juke you by flying below your visual plane, but you can always check your radar to see what side of the building he's on. Keep plugging away with Stinger missiles and he'll go down. You might consider equipping your body armor to minimize damage from his shots, but just be careful that you don't forget to use rations as needed.
Head back down the tower, but don't forget that the gun cameras on floors 23, 19, 15, and 11 are still there. Spoof them with your chaff grenades and head for the elevator where you met up with Otacon. Press the elevator button and get inside. On your way down, you'll get jumped by four soldiers in optical camouflage. Blast them with your FAMAS, and you'll continue down to the ground floor. You can explore the area around the elevator, and pick up chaff grenades, FAMAS ammo, a ration, M9 ammo, and PSG1-T ammo. Leave via the door in the southeast corner. There are cameras in these hallways so make use of your chaff grenades. Make your way through these corridors, grabbing PSG1 ammo, FAMAS ammo, and pentazem along the way. Exit to begin yet another boss fight.
Boss Fight: Sniper Wolf redux

Sniper Wolf is back, and this time, it's for keeps. You can engage her in a standard sniper duel if you like, just as you did the last time. Make use of pentazem to steady your aim, and watch for her as she moves among the trees to the north. Alternatively, you can run to the southeast corner of this area, and shield yourself against the elevated portion. From here, you can actually use Nikita missiles to safely hit Sniper Wolf. They won't do much damage per hit, but you'll be perfectly safe as you fire at her. Shoot your missiles west, then steer them toward either the west or the east side of the area before turning them north. The reason is that if you attempt to just fly the missiles north through the middle of the area, they'll slam into the hill harmlessly. By steering them along the perimeter, they can gain elevation gently before you steer them to Sniper Wolf in the trees. Be warned that you'll sometimes run out of fuel on the missile before they hit, so if you can keep track of Sniper Wolf's location, you'll know which side to steer to first, to conserve fuel.
After she's dead, you're free to search the various warehouses here for goodies. Many of these buildings have gun cameras guarding them. One along the north has claymores set up. Equip your mine detector, and gather up the claymores in that room in the north, as you'll need them later. The northeast room has ammo for all of your guns. The east warehouse has chaff grenades and regular grenades. The room in the southwest has a ration and bandages. The one in the west has Nikita ammo and another cardboard box.
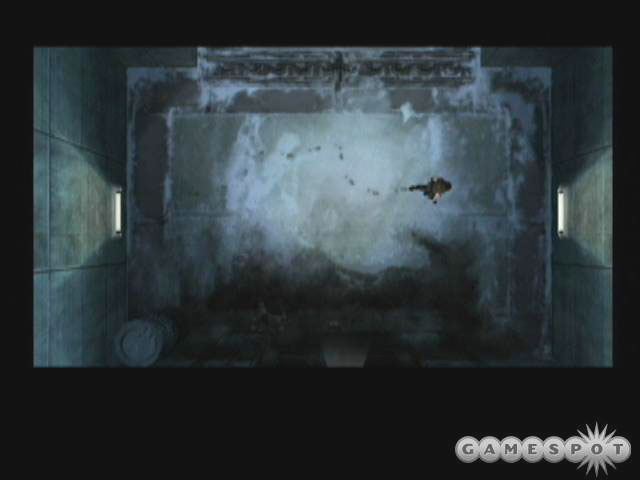
Blast Furnace

Go down the steep stairs and take out the soldier patrolling there. Walk forward to the railing and drill the soldier patrolling downstairs with a silent weapon of your choice. From here directly to your left is a short catwalk to some stun grenades. Go back to the south edge, then make your way to the left, and you'll see a narrow ledge along the west that you can shimmy across. Shimmy to the bottom corner for SOCOM ammo. There's a moving crane complicating matters though. Shoot any part of it with a Stinger to stop it from moving. Shimmy across the ledge on the west, making your way up to the north part of this factory. Go down the stairs - there's more SOCOM ammo under the stairs. Move to the left, and go down the stairs to a platform where you'll find a ration, and FAMAS ammo under that set of stairs. Go back up to the second level and toward the right and down the stairs. On this platform there's another box of rations. To the south is a hot steam room - make a mental note of this room as you'll need to return to it later. Go into the large double doors in the north east.
Cargo Elevator
Walk forward and activate the cargo elevator, by using the action button on the console. On your way down you get jumped by some soldiers. Shoot them with the FAMAS. When you reach the end, make your way over to the right, avoiding the gaze of the camera. Move to the next elevator to the right, and continue your descent. Ravens are now circling around your head. Do they remind you of anyone? When you reach the bottom here, you're in a cold area. Explore around for some Nikita ammo, and other goodies. Enter the next room to start the fight with Vulcan Raven.
Warehouse
Key Item: Lv 7 key card
Boss Fight: Vulcan Raven
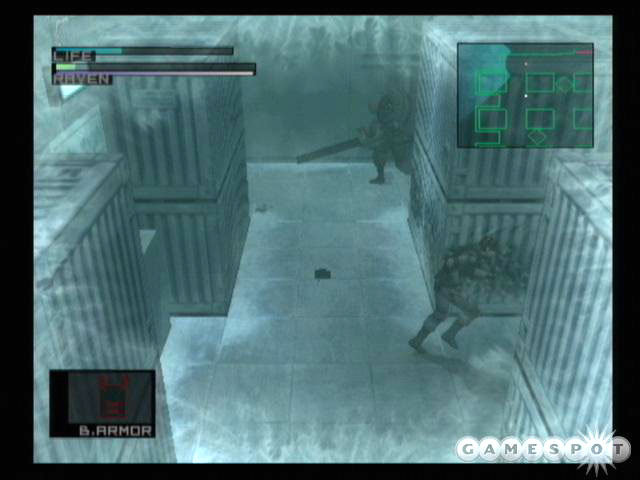
The area is set up in a grid pattern with boxes providing cover for you and Vulcan Raven. Start off by using your Nikita missiles to attack him. If you fly into his line of sight, he'll just shoot down the missile with his mini-gun. Try to fly the missile into his back. After two hits, Vulcan Raven will begin running, and your missiles have no hope of catching him from behind. Switch to your claymores or C4 and set traps for Vulcan Raven. If you've ever played a Bomberman game, you already know how to win. Drop your mines and C4 blocks in intersections, attempting to anticipate where Vulcan Raven will run. It won't take many mines before Vulcan Raven succumbs, and he gives you the Lv 7 key card. Walk north through the large doors.
Warehouse North
Equip your thermal goggles. Notice the trap doors on either side of the ration in the middle of the hallway. Don't get suckered by it. Walk along the sides of the hall to avoid them. Around the corner, there's a guard patrolling the bridge, and one way up high looking out over the bridge. As the lower guard faces the other way, move out from the corner. The top guard will see you, and run down to investigate. Quickly whip out your M9 and shoot the lower guard in the head as he stands on the bridge. The guard from the top will stop and look at his drowsy comrade, which gives you a great opportunity to shoot him with the tranquilizer gun. With both guards asleep, you now only have to dodge the cameras along the far wall. Run up the stairs on the right to where the guard was standing watch, and grab the Stinger ammo, which you'll need soon. Run back down and into the level 7 door by the cameras.
Underground Base

It's Metal Gear! Make your way to the right and up the narrow stairs. Watch out for the guards patrolling the upper levels. Take out both of them and you're free to make as much noise as you like. When you're on the third level, loop around to the left and finally up to the control room at the south end of the room to start another cutscene.
Snake, you clumsy fool! You've dropped the PAL card. Run down to the bottom level, and go to the northwest corner. Notice the rat running around near the hole here? Shoot the rat and he coughs up the PAL card. Grab it and go back up to the control room. Toss a chaff grenade in there to spoof the cameras, equip the PAL card, and go to the laptop on the left with the yellow screen. Press the action button to insert the card.

Now you've got to freeze the PAL card. Backtrack to the warehouse where you fought Vulcan Raven. It's being patrolled by several guards that you can take out however you with. Equip your PAL card and stand around in the room for a minute or two until the card turns blue and has a "W" on it. Make your way back up to the control room and insert the card into the middle laptop.
Time for the heated version. Backtrack all the way back to the steam room in the Blast Furnace area. This means a long trip up both cargo elevators. Stand around in that steam room until your PAL card turns red and has a "Z" on it. Run back to the control room and insert the card into the last laptop. You've been had! The control room shuts and fills with gas. Equip your gas mask until Otacon rescues you. Leave the room and eventually you'll take on Metal Gear.
Boss Fight: Metal Gear

Equip your Stingers, and body armor. Aim for the large disc on Metal Gear's left shoulder. It should take about six or seven hits from the Stingers to take down Metal Gear. In the meantime you'll have to avoid machine gun shots, grenades, lasers, and stomping. You'll have to de-equip the stingers to run, so if you're getting hammered, just try moving to another spot where you can get clean looks at the weak point. Remember, you don't need a lock on to fire the Stinger, so if you can get a good look, try firing without a lock-on. After you take down all of Metal Gear's health, you'll get another cut-scene.
Unfortunately, Metal Gear isn't dead yet. When you regain control, you'll have to again use Stingers to destroy Metal Gear once and for all. This time, aim at the cockpit, which is above the laser gun, and between the machine gun cannons. The drill is the same as before, only your aiming point has changed. Once you're finished with that, you get to beat up Liquid Snake with your bare hands
Boss Fight: Liquid Snake
Functionally, this fight is similar to the fight you had with the cyber ninja, AKA Gray Fox, but Liquid doesn't have nearly as many tricks. Just stick close to Liquid, and try to avoid whiffing on your first punch, or he'll take full advantage. After he's about half-dead, he'll start doing a lunging charge attack. You can pre-empt this charge by simply punching him before he can get started.
Final Fight: Chase Scene
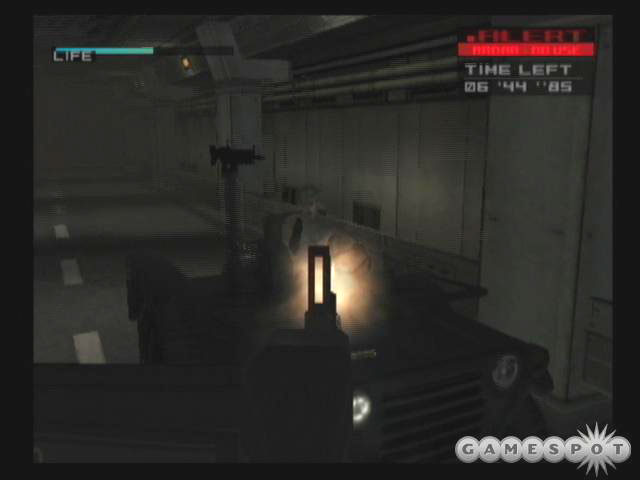
After beating up on Liquid, you end up in a corridor with either Meryl or Otacon, depending on the choice you made in the torture scene. Grab the ration next to the stiars, and the other ration in the back corner of the garage. Jump in the back of the jeep on the left, and use the mounted machine gun to take out the guards. Go into first person view for easier aiming. Shoot the barrels next to the door, so your partner can start driving off. You'll get held up at a couple of intersections, so shoot up the guards and barrels there so that you can continue along. Eventually Liquid Snake drives up behind you in his own jeep, shooting at you with a FAMAS. Go into first-person aiming, and keep shooting at Liquid until the chase ends. Congratulations! You've finished the game.
Secrets

Rank Determination: At the end of the game you get a rank depending on your performance. Your ranking depends on a number of factors, including the time you took to finish, how many times you were spotted by a camera, or guard, how many times you saved the game, how many enemies you killed, and how many continues you used.
Dog Tags: Certain soldiers in the game are carrying dog tags. You can "stick them up" for their tags, by sneaking up behind them and brandishing a gun. Snake will warn them by saying "Freeze!" The soldier will stick his hands up in the air. Run around to the front of the soldier and aim your weapon in first person at the soldier's head or groin. He'll beg for his life, and start shaking, which will eject a dog tag, or an item. You can view the dog tags you've collected via a viewer in the options menu.

Mario and Yoshi: In Otacon's lab, look in the top right corner. You'll see Mario and Yoshi dolls on top of the monitors. Shoot Mario with a gun and he makes the "1UP" noise. Shoot Yoshi and he says his name.
Eternal Darkness poster: Silicon Knights, the developers who ported MGS to the GameCube, have inserted their own easter egg. In the top right room of the Armory where you find the Nikita ammo, open up the locker. There's an Eternal Darkness poster in it, to commemorate SK's first hit game on the GameCube.
Irritate Naomi Hunter: Try equipping your cigarettes and calling up Campbell on the codec. Naomi will give you a brief lesson in the biochemistry of cigarette smoke and its carcinogenic effects.
Annoy Mei Ling: Keep calling her up on the codec without saving. After several times, she'll makes faces, and stick her tongue out at you, and refuse to talk to you.
Bandanna: If you got the "good ending" with Meryl, you get a saved game where you can play the game again with the bandanna. This gives you unlimited ammo.
Stealth Camouflage Suit: If you got the "bad ending" with Otacon, he gives you the optical camouflage suit. Play again with this item, and you should have a really easy time sneaking by guards and cameras.
Got a news tip or want to contact us directly? Email news@gamespot.com
Join the conversation